Recently, I started experiencing various issues with Chrome where I'd see an all-white or black screen, extensions would randomly crash, tabs would give -out-of-memory errors on opening, or the browser would crash and close entirely, especially when opening Zoom or other tabs with video content. And none of the usual fix-its for these Chrome problems worked (see below for details). After extensive online research and testing, I finally stumbled on the solution – my page file settings were at fault. Resetting them to the proper size solved my issue.
Here's the quick backstory.
I had an extra SSD drive sitting on my desk, so I decided to install the SSD on my Dell desktop as an additional storage drive. I had an existing hard disk storage drive which I wiped but kept in the desktop. Shortly after, I started experiencing crashes in Chrome, especially when I had many tabs open (I am frequently in the 70+ tab range) and opened a new tab with video content, whether embedded videos or Zoom calls.
Since it wasn't clear how adding an additional SSD would be connected to browser crashes, I went through the usual steps of updating all of my drivers and BIOS to address any potential hardware conflicts. That didn't solve the problem. Could it be a hardware failure caused by my installation? Nope, all the scans – RAM, processor, drives, graphics adapters – came up clean.
Next, I went through any possible solutions that could be attributed directly to Chrome. I disabled all of my extensions. Nope. I fully cleared my cookies and cache. Nope. I turned hardware acceleration off and on in Chrome settings. Nope.
Deep searches for solutions on the web turned up nothing more than repeating the steps I had already taken.
As an experiment, I opened up Microsoft Edge (with Chrome still running) and experienced similar crashes. So, that suggested it had to be something related to my system components and Windows 11. And the most likely culprits would be those most impacted by video – my graphics processors or my RAM.
I had already done everything I could think of to update and troubleshoot my graphics devices, and since I had received occasional out-of-memory errors in Chrome, I decided to take a deeper dive into my RAM usage. With the copious use of tabs in Chrome, my RAM use typically hovers in the 70%-75% range. High, but not unmanageable for my 16GB RAM desktop. However, when I searched online for issues specifically related to 70% RAM use and Chrome crashing, I came upon a recent post on the Google Chrome Help Site from a user (Jayzee J) having a nearly identical issue. And he had found a solution: it was the Windows Virtual Memory Page File settings. The page file on his system drive was too small, and increasing the size by allowing Windows to manage it directly fixed his issue.
According to Microsoft, "Page files enable the system to remove infrequently accessed modified pages from physical memory to let the system use physical memory more efficiently for more frequently accessed pages." In other words, as RAM usage increases, Windows starts using your drives (hard drive or SSD) as virtual RAM to help it manage program needs. And while I should have been fine at 70% RAM, something about opening video content was likely causing my RAM usage to spike and creating issues for Windows, just as it was for Jayzee.
When I went to check my own settings, I was in for a surprise – my virtual memory was set to "No paging file." Quite odd since the default in Windows 10 and Windows 11 is "System managed size," and I'm pretty sure I never intentionally turned it off. My Dell came from the factory with a small SSD system drive and a secondary hard disk storage drive. My best guess is that the setting was changed somewhere in the process of installing the new SSD and wiping the original Dell hard drive storage. Perhaps because my Dell had been configured to use the hard disk to store a virtual memory page file for the system drive, I had inadvertently wiped it? I don't know. However, changing the virtual memory page file back to "System managed size" and restarting my computer immediately fixed all of my Chrome and Edge crashing issues.
How to modify virtual memory page file settings
To check or modify your own virtual memory page file settings:
- Open Windows Settings and click on "System."
- Scroll down on the right side and click on "About."
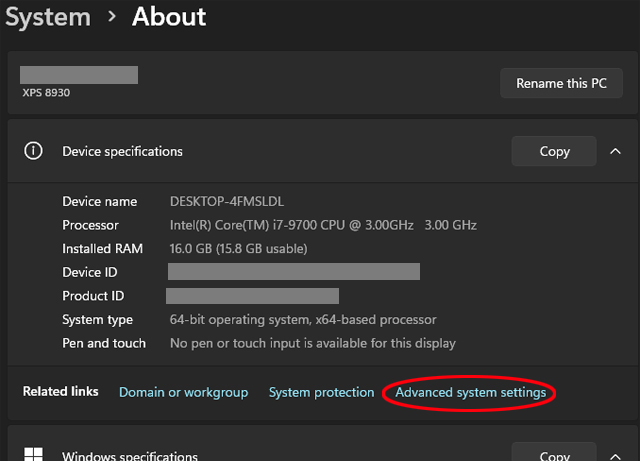
- Under "Device Specifications," click on "Advanced system settings."

- Click on the "Advanced" tab and then click the "Settings" button under "Performance."
- Click on the "Advanced" tab and click the "Change" button under "Virtual memory."
For most users, you're better off checking "Automatically manage paging file size for all drives" or at least ensuring "System managed size." Assuming one of your disks is an SSD, you may get slightly better performance placing the paging file on that drive than a hard drive. If you plan on putting the page file on your system disk and it has very little free storage space left, you may need to clean up files and programs to allow Windows to create the recommended paging file size.
[Image credit: Screenshots via Techlicious, computer on wood table via Smartmockups]
Josh Kirschner is the co-founder of Techlicious and has been covering consumer tech for more than a decade. Josh started his first company while still in college, a consumer electronics retailer focused on students. His writing has been featured in Today.com, NBC News and Time.


