It can be valuable to have a recording of your phone calls, whether you want to ensure you can check the details from a call or need to record an interaction with customer service. Apple doesn't have a built-in call recording feature because there are federal and state laws that prohibit secretly recording phone conversations. (If you were thinking of the Screen Recording function you can access through your Control Center, you're out of luck. If you try to record a call that way, you won't capture any audio.)
However, there are apps that will enable you to record a call. The apps don't record the call on your iPhone; they create a three-way call with you, the person you're calling, and the app service. When you hang up, the recording is saved by the service and then downloaded to your iPhone.
We tried a bunch of the call recording apps, and our favorite app is Call Recording by NoNotes (it's also our pick for recording calls on Android phones). It's easy to use, provides consistent results, and you can have your calls transcribed for a fee. Here's how it works.

Note: There are federal and state laws that prohibit secretly recording phone conversations. Before recording any conversation, you should check your local laws about wiretapping — and, yes, recording personal phone calls counts. Following the law is usually as simple as making sure the person you're speaking with doesn't object to being recorded.
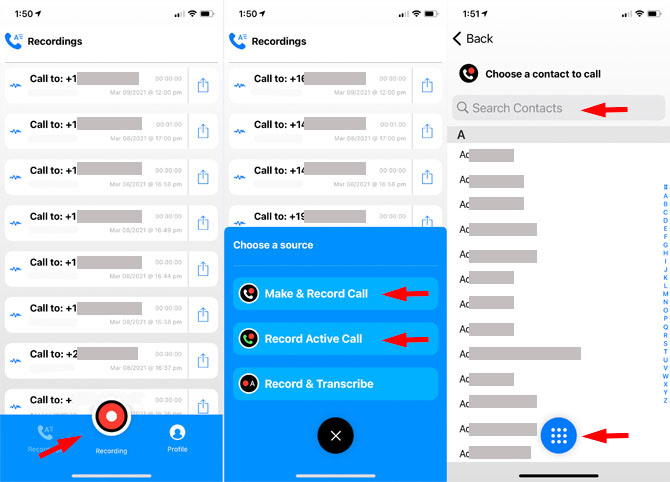
How to record a call you initiate on your iPhone
- Open the NoNotes app.
- Select the "Recording" button.
- Select "Make & Record Call."
- Select contact that you want to dial or tap the phone icon and dial the number.
- NoNotes calls you and tells you how many free minutes you have left and then dials the number.
- Conduct your conversation as usual and hang up.
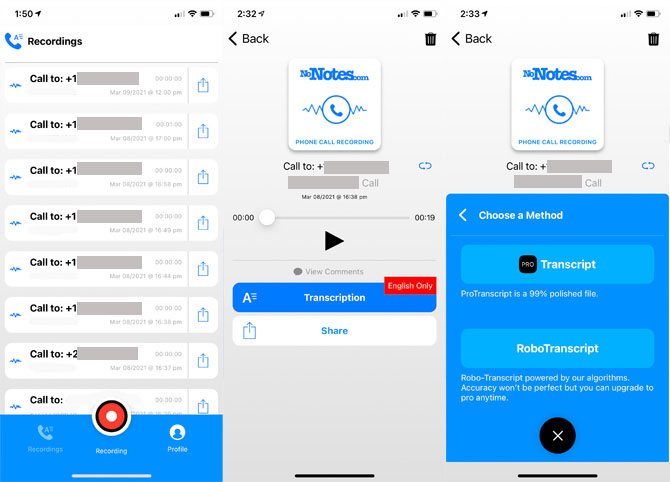
After you hang up, your recording will be available in the NoNotes app.
How to record a call you receive on your iPhone
- Answer the call.
- Open the app.
- Select the "Recording" button.
- Select "Record Active Call." NoNotes will then call your phone.
- Select "Hold & Accept" and you'll be connected to NoNotes. You'll hear how many free minutes you have left.
- When you hear the beep, select "merge calls".
- Conduct your conversation as usual and hang up.
When you hang up, your recording will be ready.

If you make the call, you can choose the "Record & Transcribe" option, which will provide a transcription of the call. You can choose from RoboTranscription, which uses voice recognition to create the transcript, or Pro Transcription, which produces a "99% polished" file. Transcription packages start at $45 for an hour of transcription.
If you want to record more than 20 minutes of calls per month, you'll need to step up to an unlimited plan, which costs $9.99 per month or $99.99 per year.
[Image credit: NoNotes]
For the past 20+ years, Suzanne Kantra has been exploring and writing about the world’s most exciting and important science and technology issues. Ten years ago, she founded Techlicious, which serves the role of that tech-savvy friend you can count on to share tips and tricks to get the most out of technology; whether that’s saving time in our hectic schedules, discovering new ways to enjoy our personal interests, or keeping up with the latest technology trends and styles. Before that, Suzanne was the Technology Editor for Martha Stewart Living Omnimedia, where she hosted the radio show “Living with Technology." Previously, she served as Technology Editor for Popular Science Magazine. She has been featured on CNN, CBS, and NBC.


