Our phones come with us everywhere. We use them to snap photos, read the news, post on social media, play games, and plenty more. But the more we do with our phones, the more likely we are to fill up their limited storage space.
This is particularly true for iPhone owners, who have no way to upgrade their storage once they've bought the phone. So when you get that dreaded "Not Enough Storage" error message, the only answer is to start cleaning out files. (Or buy a new iPhone.) But if you know where to look, finding what's taking your storage space — and deleting it — is simple. And except for having more storage space, you may not notice you've deleted anything at all.
What's eating up your iPhone's storage space?
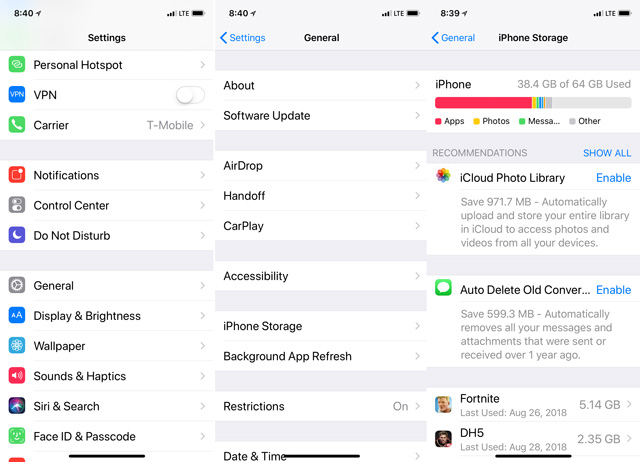
The first step to cleaning out your iPhone is to find out what's using your storage space. To see the breakdown, go to Settings > General > iPhone Storage. At the top of the screen, you'll see a chart listing how much of your storage space is being used and what's using it.
It's broken down into Apps, Media, Photos, Mail and a nebulous Other category. While the rest of the categories are pretty straightforward, "Other" encompasses everything that doesn't fit into the other categories. But if you scroll down you'll see a list of exactly what's using your space, with every app listed.

Now that you know what's taking up storage space, it's time to do something about it.
1. Get rid of unwanted photos
For most of us, constantly snapping photos takes up most of our storage. But you don't need to delete entire your photo library to free up space — but cutting down on the number of photos or moving your photos to the cloud will free up a lot of room.
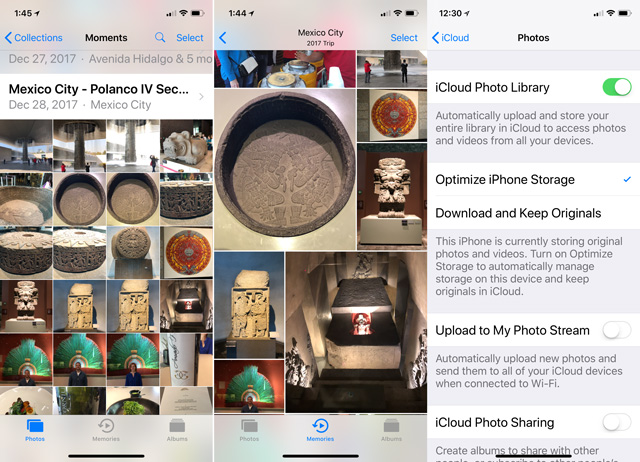
iCloud Photo Library can store your photos and videos in iCloud instead of on your local device, which is a huge space-saver. You'll still have some photos on your phone, but everything beyond the most recent pictures will be in the cloud. If you want to see an image that's not on your phone, just tap the thumbnail to download it to see it in high resolution. Another convenience is that you'll be able to see your photos on all of your iOS devices and PCs.
To turn it on, go to Settings > Name > iCloud > Photos and then toggle on iCloud Photo Library. Be aware that doing this will use your iCloud storage space — you have 5GB by default, but if you need more you'll have to pay. 50GB will cost $0.99 per month, so it isn't a huge extra expense. Once you've moved your photos to the cloud, you can also save photo storage space by toggling on Optimize iPhone Storage, which will only keep smaller files on your local device, though the high-resolution images will still be saved in iCloud.

If you don't like iCloud Photo Library or don't want to spend extra money on iCloud space, you can use a third party photo storage service. Amazon Prime members will like Amazon's Photos app which backs up your photos and saves them in your Cloud Account. Storage is unlimited for Prime members, so there's no cost to worry about. The Google Photos app does the same thing, only it keeps your photos on Google servers instead of Amazon or Apple servers. You can also manually back up your photos to your computer using iTunes and choose which photos you want to be synched with your phone.
But if you're only looking to cut back a bit, you can delete any photos you don't need manually. Just open Photos, click Select in the upper right, tap any photos you want to get rid of, and then tap the trash icon in the lower right. Once you've deleted them, you have to really delete them because iOS holds on to photos for a while in case you want to recover them. In Photos, click Albums in the lower right, open the Recently Deleted album, click select in the upper right and then delete all in the lower left.
2. Reduce the space it takes to store photos and videos
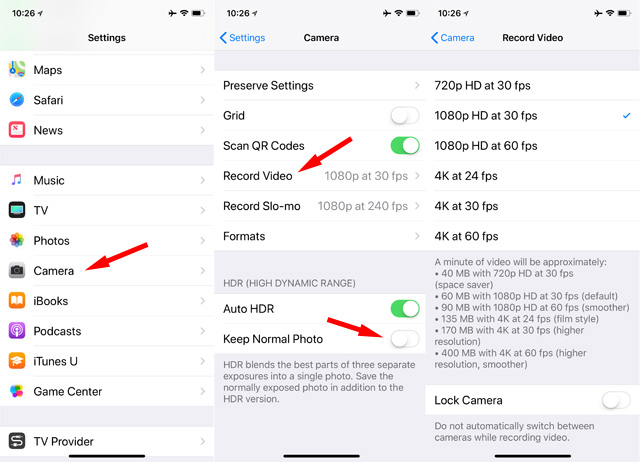
Your iPhone camera is capable of taking some amazing photos and videos… but high-quality images take up lots of space. Go to Settings > Camera. From there, scroll to HDR and unselect Keep Normal Photo, which means your iPhone will only keep one photo whenever you snap a brilliantly colored HDR photo. Otherwise, your phone keeps an HDR version and a normal version of every HDR photo, which adds up over time.

Next, downscale your video recording settings. The newest iPhones can record up to 4K video at 60 fps. That makes for some very sharp video, but if you don't need super high-resolution footage, don't waste the storage space. In your Camera settings change the option under Record Video to a lower quality.
3. Offload unused apps
Apps can take up a lot of your precious storage space, but if there are any you don't use, they're easy to delete. Just press and hold any app on your homescreen. When the icons start jiggling, click on the X in the upper left to delete them — though this will also get rid of any information you have stored in the apps, so you don't want to delete apps you may need.
However, you can get rid apps them without getting rid of any of their settings by offloading them. Their icons will stay on your homescreen and their data will stay on your phone, but if you tap their icon to open them, your phone has to download them again. However, they'll look just like they did last time you used them: all of your settings will still be there.
You can manually offload any apps you don't need installed all the time from the iPhone Storage screen. Just click on any app and select Offload App. To save as much space as possible, start at the top of the list — those are the apps that use the most space.
But if you don't want to bother manually going through all of your apps, iOS can do it for you. Just go to Settings > iTunes & App Store and toggle on Offload Unused Apps at the bottom of the screen. This will automatically get rid of anything you haven't used in a while.
4. Delete files in apps
The space an app takes up isn't necessarily all from the app: it can also be from files the app has downloaded. You could have downloaded books in iBooks and Kindle, or audiobooks in Audible. Music or Spotify might have downloaded tracks. Your favorite podcasts app may be full of back episodes. Netflix could be hanging on to movies you've downloaded. If any of your apps are taking up a lot of space, you should check to see if they're storing old files before you delete them outright.
If you have an app that hangs on to files for you to watch offline — like any of the ones mentioned above — take a look to see if it's keeping files on your device. Directions will vary for each app, but typically you'll find files stored in a library tab, where you can see what you've downloaded to your phone. Often you can swipe left and tap delete on anything you want to delete from your phone.
5. Delete old Messages
You may not realize it, but your iMessages are probably taking up a lot of space. Your messages may include photos, videos, and other files — and by default, they're never deleted.
You'll save the most space by moving all of your messages to iCloud. Just like turning on iCloud Photo Library, moving your messages to the cloud gets them off your phone and makes it easy to see them on all of your devices. Also like iCloud Photo Library, this means your messages take up iCloud storage space. But if you'd rather use iCloud storage than local storage, go to Settings > Name > iCloud and toggle Messages on.
You can manually delete conversations by opening your message app, swiping left and clicking delete on each conversation. But your iPhone can also delete old conversations automatically. Go to Settings > Messages and scroll down to Message History and then Keep Messages. Select 30 days or 1 year to clear out your oldest messages. Then go to Settings > General > iPhone Storage and click Review Large Attachments to see if there are any large files hiding in your messages that you can clear out.
Now you can get back to taking snapshots
If you've gone through all of these steps, you should find yourself with plenty of space. And if not… well, maybe it is time to dust off your old iPhone and update.
[Image credit: woman using iPhone via BigStockPhoto]


From Kim Dufour on September 22, 2021 :: 7:46 pm
Hello there, I really like this article and I want to use it.
A the top of your article it says follow these steps for both iPhone & android. I Just purchased an android,Galaxy S21 5G.
Thru this entire article, u did not give the steps for an android phone, only for an iPhone.
I don’t think The instructions in the article, Which clearly says iPhone for would equal the same for an android, am I wrong?
Would these be the exact same instructions for my android?
Thank u & if u would please reply back to me soon, it would be greatly appreciated!
Kim Dufour
B Well
Reply
From Josh Kirschner on September 23, 2021 :: 9:45 am
Hi Kim,
Not clear where you’re seeing a mention of Android in our article. However, the main idea for what to clean out would be the same for an Android phone, as well, including your Samsung Galaxy. We have a separate article with the specific details for how to clean out your Android phone.
Best,
Josh
Reply