
Snapchat has become increasingly more popular since its debut in September 2011, with over 100 million active users. After questionable beginnings, which left parents worried their children were sending inappropriate pictures and all users wondering if their Snaps had actually been deleted, the social service has become mainstream. And, as it grows, more features are constantly being added. The following guide will catch you up to where Snapchat stands today, with helpful walk-throughs of all of the app's features.
What is Snapchat?
Snapchat is a mobile app and social sharing service available for iOS and Android (although not for tablets) that lets you send and receive still images or up to 10 second videos that disappear after being watched. Over time, the app has evolved to add a lot of features, including chat, stories and discover (we’ll get to that in a bit). These features let you connect easily with your friends and celebrities, catch up on news and become involved in events.
The Photo/Video Capture Menu
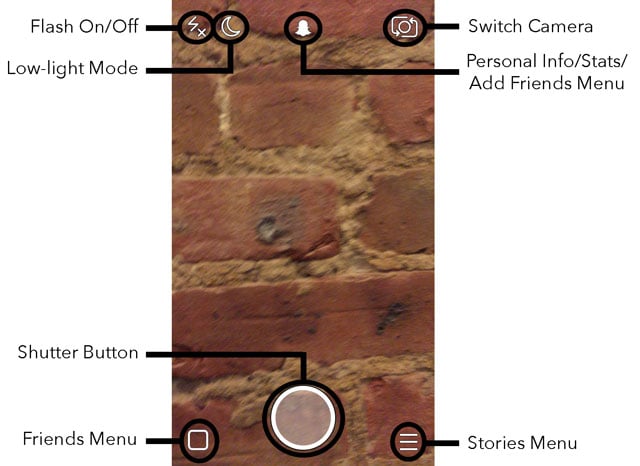
When you open the Snapchat app, you will be directed to the page that lets you take a photo or video. There are multiple icons on the top and bottom of the screen. The large button in the bottom middle of the screen is the shutter button. Tap it once to take a photo, or hold it down to create a video.
The two symbols to the left and right of the shutter button will take you to other app menus. The outlined square at the bottom left takes you to your Friends list, while the three horizontal and parallel lines at the bottom right take you to the Snapchat Stories menu.
At the top left is a lightning bolt — this is where the flash or no flash options are located. If the flash is on, there will be a single lightning bolt symbol. If the flash is off, there is a lightning bolt with a small “x” to the right of it. When the flash is on, both regular photos and selfies will be illuminated. For iPhones, Snapchat illuminates the whole screen with white so your face is lit right before snapping the photo.
Just to the right of the lightning bolt, there is a crescent moon symbol; this is how you turn on Snapchat’s low-light mode. Press the moon to toggle the feature on (the crescent moon will be filled in) or off (the crescent moon will not be filled in).
The ghost at the top middle section of the screen will take you to your personal account info and your stats (more on this option below).
Finishing off the top row of options is either a camera symbol made up of two arrows at the top right corner of the screen or a square with a smiley face in it. This lets you switch the view from the regular camera mode to the selfie camera mode.
Taking and Sending Snaps
Taking a Snap
While taking photos sounds straightforward, Snapchat has many options that make the process a tad more complex (but in a good way). When you’re in the Photo/Video Capture menu, you can take regular photos or selfies. All you have to do to switch modes is press the icon at the top right corner of the screen; this will switch camera view modes.
You can focus on any item by pressing your phone’s display on the item. This technique can also help adjust the lighting of the photo by increasing or decreasing the brightness you see on the screen.
You can turn the flash on or off by pressing the icon at the top left corner of the screen. The flash is on when the icon is a lightning bolt, and it is off when the icon is a lightning bolt with a small “x” to its right.
Taking the photo or video itself is very straightforward. You can press the large, circular shutter button shown in the bottom center part of the screen once to take a photo, and hold down on it to take up to a ten-second video.
Lenses
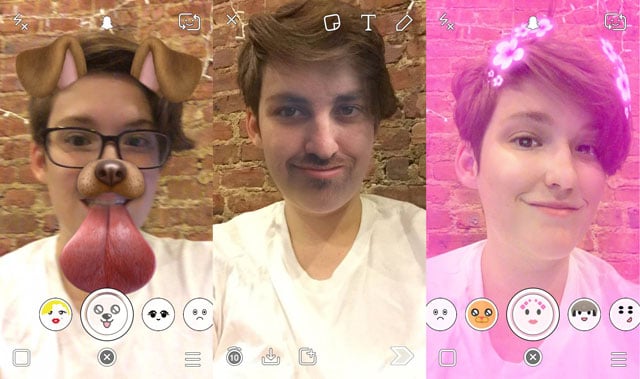
One of the biggest recent changes Snapchat has made involves lenses. These lenses are special ways to modify your look. To access lenses, open Snapchat and focus the viewing window on a face (whether it’s your own or someone else’s). Press and hold your fingers on your face in the viewing window until you see a grid mapping the contours of your face and a variety of lenses beside the shutter button. This process can be a bit finicky, and works best if you are someplace with a lot of light. You can use lenses in both still snaps and video snaps, and the lens overlay will follow your face as you move around.
There are lots of lenses to choose from, and they change every so often. You can make yourself look like a dog, a panda, an old person and more, and there are often lenses that make it look like you’re looking into a fun house mirror. Sometimes, the lens will direct you to open your mouth or raise your eyebrows, and when you do, an animation will play. For example, if you use the dog lens, opening your mouth will cause a long, pink tongue to extend from your mouth. Recently, Snapchat added a face swap lens that lets you and a friend switch faces. It’s always fun to see the lenses that Snapchat’s developers feature every day.
Preparing to Send Your Snap
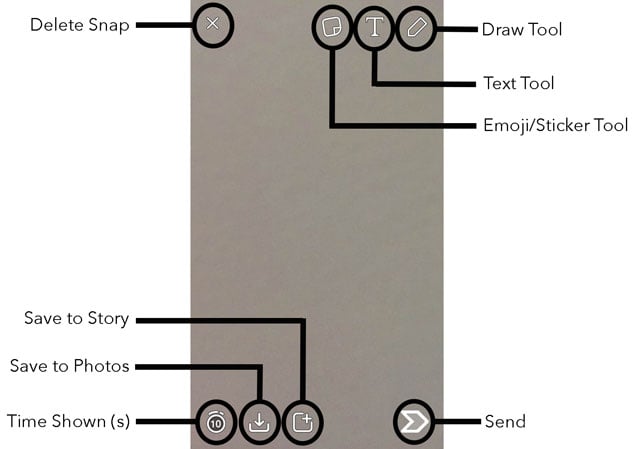
There are a lot of ways to modify your photo or video after you take it (and if you don’t like the way the photo turned out, press the “x” icon at the top left corner of the screen and you’ll be taken back to the Photo/Video Capture menu). If you took a photo, you can modify the amount of time a friend sees it by clicking on the clock icon at the bottom left part of the screen. You can choose any amount of time between one second and ten seconds.
If you would like to save the photo, along with any modifications you have made to the photo or video, to your photos, select the icon that shows an arrow pointing down into what looks like an inbox icon.
Emojis & Stickers
You can add emojis and stickers to your photo to add some flare by pressing the sticky note icon at the top of the screen. After choosing an emoji or sticker, you can move it around anywhere on the photo or video with just one finger. To increase or decrease its size, place two fingers on or around the sticker or emoji and spread the fingers out to increase its size or bring them closer together to decrease its size. You can also rotate the sticker by keeping one finger stationary (to define the axis) and letting the other move around the axis. If you decide to get rid of the sticker, put your finger on the sticker and move it to the trash can that appears where the sticky note icon was.
Text Tool
To add text to your image, select the “T” icon at the top of the screen. From there, a translucent black bar will come up along with your keyboard so you can write a message. After typing the message, you can move the black bar with text to your desired location with your finger. If you press the “T” again, you will get rid of the black bar and the text will become larger and be centered in the screen. You can also change the text’s color using the rainbow bar that appears at the top right corner of the screen. Pressing the “T” icon one more time will move this larger text to the left side of the screen.
Draw Tool
You can draw or write anything on the photo or video by pressing the pencil icon at the top right hand part of the screen. Choose any color out of the rainbow of options that pops up below the pencil icon. There is also an undo icon to the left of the pencil that lets you erase any markings you make.
Filters and Geofilters
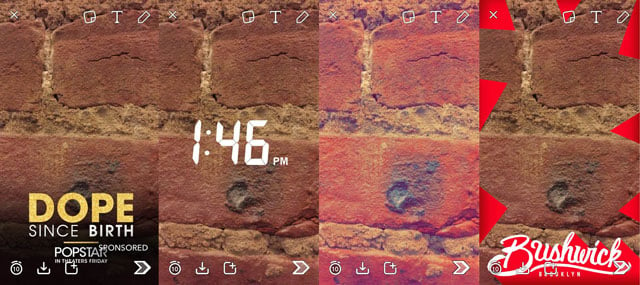
You can add filters to your picture and video snaps. Filters can include your location (as long as you've allowed Snapchat to access your location), sponsored content, the time, your speed, the temperature, as well as colored layovers reminiscent of Instagram. Special Snapchat video filters let you modify your video Snap and give you the ability to slow down or speed up your video Snap.
To access filters, just swipe to the left or right after capturing a Snap.
Sending Your Snap
So who is going to see your masterpiece? If you press the square with a plus sign at the top right corner icon at the bottom of the screen, your Snap will go to your Story. Any of your friends can then view your Snap as many times as they want for 24 hours. In Settings, you can also choose a specific group of people who can view your Story.
To send your Snap to a certain group of friends, press the blinking right-facing arrow at the bottom right corner of the screen. You can then choose who to send the snap to, and add it to your Story at the same time if you would like.
The Personal Info/Stats/Add Friends Menu
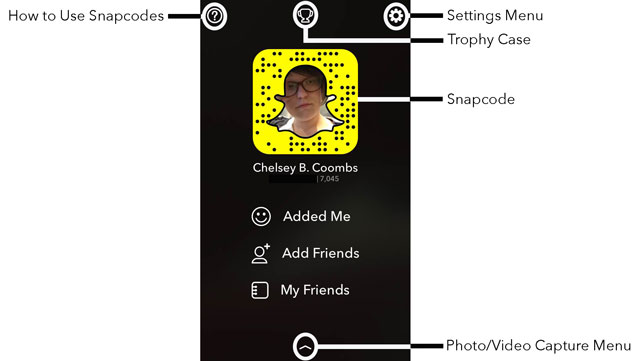
First go to the personal account info and stats screen by either tapping on the ghost symbol at the top of the photo/video capture menu or by sliding your finger down the display. You’ll see your personal Snapcode, which is a unique identifier that, like a QR code, lets your friends find you simply by taking a picture of the symbol. It’s a yellow square with the Snapchat ghost in the middle, along with dots in a particular order throughout.
Snapchat recently added an option to create a moving gif picture of you inside your Snapcode’s ghost. Just press your Snapcode and you’ll be taken to a capture screen that takes a series of photos of you in rapid succession. Immediately below your Snapcode is your display name, and below that is your username and a number that shows you how many Snaps you’ve ever sent.
Below that are three menu options: Added Me, Add Friends and My Friends. When you click on Added Me, you will be taken to a menu that shows you the accounts that added you and you’ll be able to accept and add them back by pressing the plus sign to the right of their names. It’s important to know that you can only send and receive Snaps from people you have accepted onto your Friends List.
The Add Friends menu lets you add friends by username (a good way to add celebrities), from your phone address book, by Snapcode and by nearby locations. You can also share your username with friends through text message, email and a whole host of other ways.
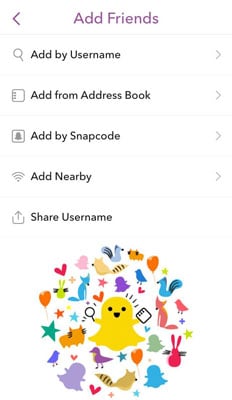
To add by Snapcode, simply take a photo of a person’s Snapcode, then upload it through the Add by Snapcode option. As an alternative, in the main picture and video capture screen, you can press and hold on a Snapcode that’s visible through your smartphone camera’s viewfinder to automatically add them.
The Add Nearby option is great if you’re at a party or hanging out with someone who you want to add to your Friends list. Be aware, though, that your name will be visible to all of the other people who are nearby you, and not just the person you want to add.
The My Friends option takes you to your Friends list, which is explained below.
At the top of this menu are three symbols, a question mark with a circle around it at the top left corner, a trophy at the top middle and a gear at the top right corner. The question mark shows you how to add people by pressing on their Snapcode, as discussed above. The trophy takes you to your Trophy Case, which rewards you for performing certain tasks like verifying your phone or email address. While the Trophy Case’s rewards are concealed by the lock emoji, there are helpful lists that tell you how to unlock each one.
The Settings Menu

You can access the Settings Menu by going to the Personal Info/Stats/Add Friends Menu, then pressing the gear symbol at the top right corner. You will be taken to a menu that lets you change your display name, add your birthday, phone number and email address, as well as change your password or add login verification, which requires you to have a verification code whenever you try to access your account from a new device. The Notifications option lets you choose whether notifications make sounds when you received Snaps or Chats or ring when you receive audio calls or video chats.
Snapcash is a way to send and receive money from friends, and by selecting this option, you can add a debit card to your account for this purpose. You can also reduce fraud by turning on the Security Code setting, which requires you to input the debit card’s CVV before being able to send money to a friend. From this option, you can also view all of your transactions and receipts from using Snapcash.
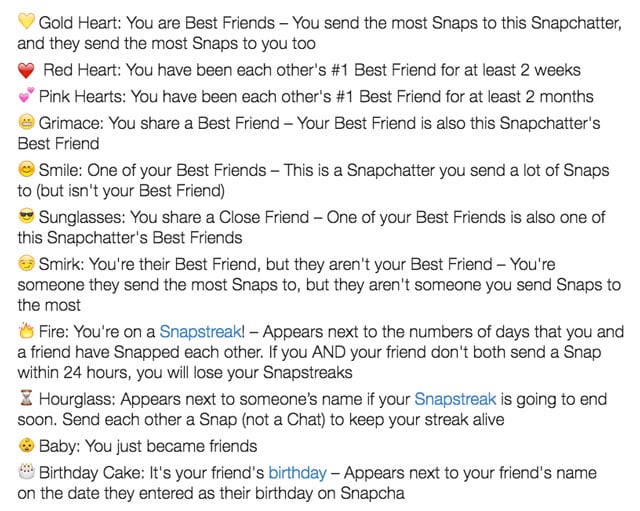
The Manage Additional Services option in the Settings Menu controls a lot of privacy options. Some filters require the use of your location to be available, and you can allow that use in this menu. Turning Travel Mode on will keep you from overdoing it on your mobile data bill by tapping to load content ahead of time over Wi-Fi instead of downloading it when you’ve only got a cellular data connection. You’ll also find the Friend Emojis list here, which details what each emoji to the right of a friend’s name means (the fire emoji shows you that you and your friend are on a Snapstreak by sending each other Snaps each day). You can also change the default Friend Emoji here, as well (that fire can easily become the poop emoji if you so choose). Finally, Permissions will take you to your phone’s settings menu where you can turn on or off Snapchat’s ability to use your location, contacts, notifications, etc.
The Settings Menu will also allow you to determine who can contact you or view your Snapchat Story, whether it be everyone or only your friends. An option to clear browser data and conversations from your phone is also available in this menu.
The Friends Menu
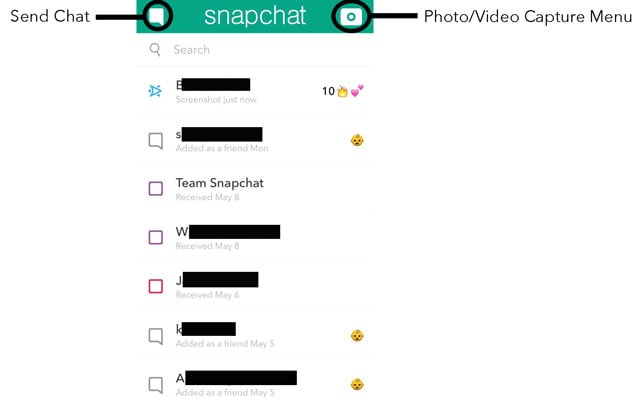
Swiping right from or pressing the square at the bottom left of the Photo/Video Capture Menu leads you to the Friends Menu. You can always return to the Photo/Video Capture Menu by pressing the camera at the top right corner of the screen. This is where you will find a list of all of the people who you've sent and received Snaps from recently, as well as a search bar that lets you find the saved Chats you've sent to people in the past. Swiping right on the name of any friend leads you to your personal Chat box with them (discussed below). The conversation bubble icon at the top left part of the screen also takes you to the Chat Menu, where you can send messages to anyone on your friends list.
Snapchat Icons and Emojis in the Friends Menu
There are quite a few icons that are displayed to the left and the right of the names of all of your friends. The icons to the left show you the status of your message—has a friend received your Snap? Has she opened it? Did she take a screenshot of it? The icons to the right show your relationship with that particular friend—have you sent each other Snaps every day for some amount of time (otherwise known as a Snapstreak)? Did you just add this friend. A handy guide to all of the Icons, produced by Snapchat, is located below.
![]()
Snapchat Chat
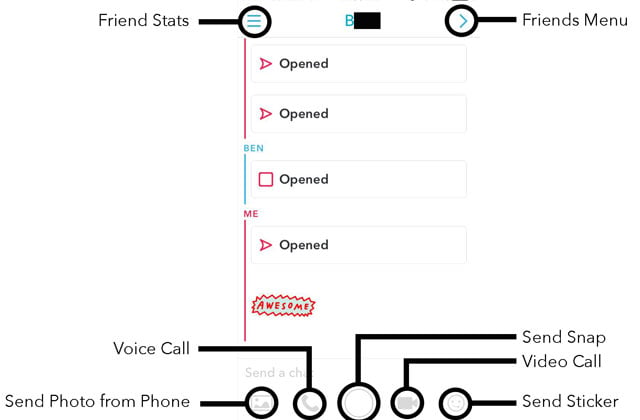
Snapchat has completely revamped their Chat function. When the service first debuted, you could only send Snaps to your friends; now, you can also chat with them within the app! To chat with a particular friend or view your chat history with a friend, swipe right on her name from the Friends Menu, and you will be taken to an individual chat box. From there, you can Snap that friend by pressing the big circular icon in the bottom middle of the screen. But you can do so much more, too. If you want to call your friend (it works over wifi or cellular internet service), you can press the phone icon or the video camera icon for voice and video calling, respectively. The landscape icon at the bottom left part of the screen brings up photos that are on your phone, so you can send whichever one you want your friend to see. Snapchat also recently added Stickers to Chat- they're illustrated specifically for Snapchat and their subjects feature a wide emotional range.
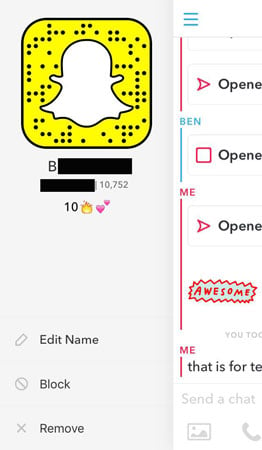
From the Chat box, you can also pull up the stats of any of your friendships by pressing the three horizontal, parallel lines icon at the top left part of the screen, or by swiping right. Stats include a friend's Snapcode, their display name, username, their Snapchat Score (how many times they have sent Snaps to their friends), as well as your relationship to them in Emoji Icons. You can also edit the name you see when you Snap them, block the person or remove her from your Friends list.
The Stories Menu
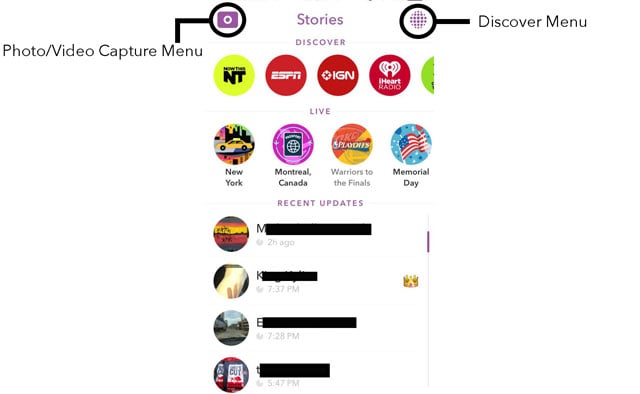
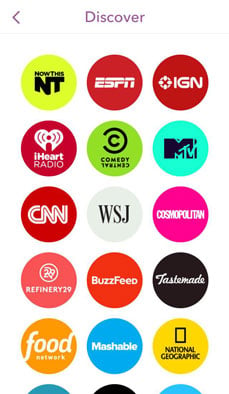
The Stories Menu is an easy way to find out what people nearby are snapping, as well as what brands like ESPN, CNN, BuzzFeed and more are up to. To get to the menu, swipe left while on the Photo/Video Capture menu or press the three horizontal, parallel lines icon at the bottom right part of the Photo/Video Capture Menu's screen. At the top of the Stories screen is the Discover section. Snapchat chooses 20 brands, mostly media companies, that publish new content that's anyone who uses the Snapchat app can access. It's a fun and easy way to keep up with trending lifestyle content and news stories. You can also access the Discover Menu by itself by swiping left from the Stories Menu or pressing the globe icon at the top right corner of the screen (see below).
The next section is devoted to Snapchat Live. If there are big events or holidays happening, Snapchat curates the best Snaps from users in that section under categories. If you're in a big city, there is probably a Live story dedicated to all things Big Apple or Windy City, for example. Sporting events are also big on Snapchat Live- from the Stories Menu, you can watch highlights as they happen or catch up on them after the game.
The last section shows features the Snapchat Stories your friends have posted in the last 24 hours. Click on any friend's name and you will be able to see all of the Snaps they've chosen to go public with that day. The Stories of celebrities that you've added on Snapchat are also located here.
The Discover Menu
[Top Image via 360b/Shutterstock; Snapchat Icons via Snapchat; Friend Emoji List via Snapchat; All Other Screenshots/Graphics via Chelsey B. Coombs/Techlicious]






From Nelliebell87 on June 03, 2016 :: 8:16 am
This guide is great! Now do you have one with Twitter for all of the #trending, retweet battles and just searching around?
Reply
From Suzanne Kantra on June 07, 2016 :: 11:47 am
Glad you like the guide! We do have one for Twitter: https://www.techlicious.com/guide/twitter-101-understanding-the-basics/
Reply