 Since mid-October, Apple users have been exploring the 180-plus features in its newest operating system, OS X Yosemite (version 10.10). The new partnership between your Mac and iOS devices makes waiting the hour (or more) to upgrade your Mac to Yosemite (for free) well worth the wait. The Calendar got smarter, Safari has a sleeker interface and iCloud Drive files are now available offline.
Despite the excitement, some of Yosemite’s features can be tricky to implement or require some configuration before you can take full advantage of them. Here are step-by-step instructions on how to get started with seven of Yosemite’s standout features.
1. Pull up Notification Center with a swipe
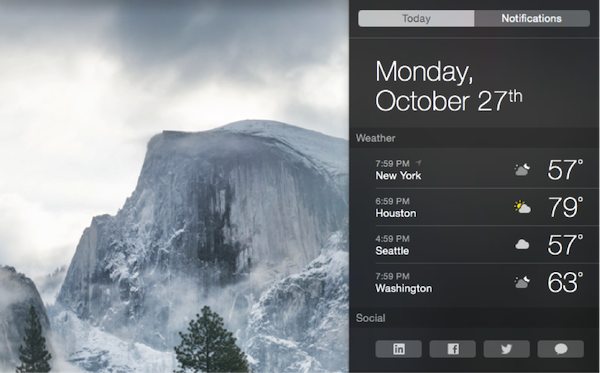
The Notification Center is your home base for everything going on in your world. It alerts you each time you get a new email, FaceTime call and more via an announcement that pops up in the top right of your screen. You can respond to text messages from your iPhone, use the calculator app or review your favorite stocks right in the Notification Center.
With so much going on, you may find yourself checking the Notification Center as routinely as you do your Facebook feed. To quickly access Notification Center from your Mac, just swipe left with two fingers from the right edge of your trackpad. To activate this feature, go to System Preferences > Trackpad > More Gestures> Notification Center.
2. Do some math with Spotlight Search

Spotlight Search is one of the tools that got a significant boost in Yosemite, evolving from a simple hard drive search tool to the keeper of just about everything from maps to word definitions to movie trailers. One of the coolest (albeit some might think nerdiest) features is the ability to handle quick unit conversions. Not sure how many pesos make up $100? Curious how fast 130 kph on the autobahn is in mph? Spotlight can tell you.
To pull up Spotlight Search, hit Command-Spacebar, or select the magnifying glass located at the upper right corner of your computer screen. Enter whatever you’d like to convert into the giant search field that pops up in the middle of the screen, and Spotlight will do the rest.
3. Rename your files in batches
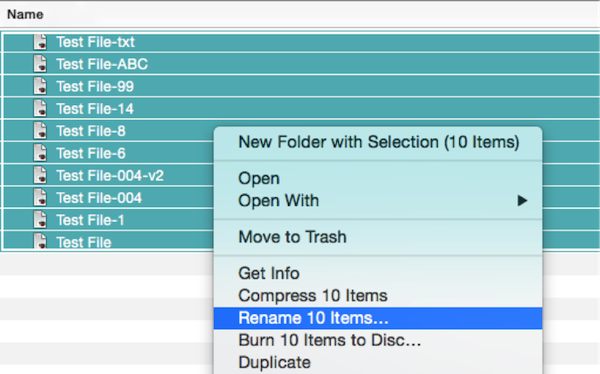
If you’ve ever uploaded a memory card’s worth of vacation photos to your Mac, you’ve probably noticed hundreds of files named something like “DSC_789.CR2.” Not too useful a file name, huh? So you’ll be grateful that Apple finally wised up and added Batch Rename to its list of bells and whistles. Batch Rename allows you to rename a series of files simultaneously with a nomenclature that makes sense to you. (Before OS X Yosemite, you needed an application such as Automator to rename multiple files.) No more photos named “DSC_789.CR2” for you.
Just highlight the files you want to rename and right-click. Choose “Rename [number of] Items” and then choose the format you’d like from the drop-down menu. Finally, create your custom name format and hit Rename.
Tip: You should never rename folders and items that came with your Mac such as the Library folder, your home folder (the one with your name on it) or file extensions (.jpg, .pdf, .xmp, and so on). Doing so would create problems down the road that could require you to reinstall your software or even prevent you from opening your files.
4. Open a private browsing window without disrupting Safari
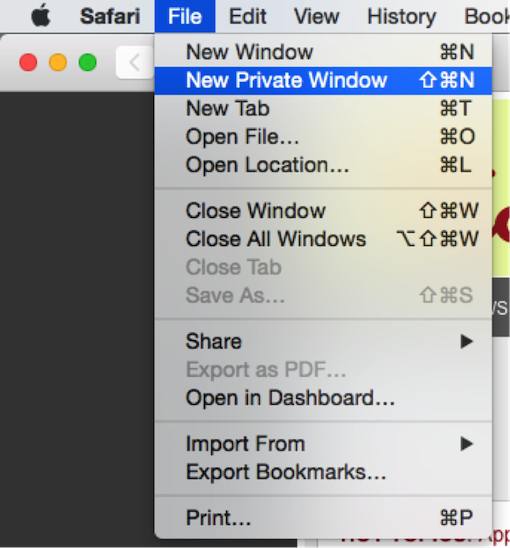 It’s often useful to keep your Internet browsing habits a secret during the holidays. (Think holiday shopping and travel reservation research.) Before Yosemite, the only way to hide your browsing activity was to keep every single window and tab in Safari defaulted to private. Unfortunately, that means those 10 or so tabs you had opened for your webmail, shopping and social media sites were cleared of their information, forcing you to reenter all of your usernames and passwords.Not any more! In Yosemite, you can open a separate private window without affecting everything else.
To activate private browsing in Safari, go to File > New Private Window or press Shift-Command-N. When you're done browsing, just close the window.
Tip: You can tell the difference between a private browser window and a regular window by the address bar color; a private window’s address bar is dark gray, while a regular address bar is white.
5. Hand off a task between devices

The heightened continuity between your Mac and iOS device is truly one of the most useful features in Yosemite. One feature in particular, Handoff, allows you to pick up a task on your Mac from the point that you left off on your iOS device, or vice versa. Handoff works with Calendar, Contacts, Keynote, Mail, Maps, Messages, Notes, Numbers, Pages, Reminders and Safari.
Say you're drafting an email to a colleague from your iPhone but can't handle typing on a small screen. With Handoff, you can easily continue writing the message in Mail from your Mac. Just look for the Handoff app icon on the left side of the Dock (next to the Finder icon), click on it and your work will instantly be beamed to your Mac, letting you continue there. No more saving an email in draft form or emailing yourself a copy to complete later.
To set up Handoff, make sure you’re signed in to iCloud with the same Apple ID on your Mac and iOS device. Then turn on Bluetooth on all of your devices: on your Mac, go to System Preferences > Bluetooth; on your iOS device, go to Settings > Bluetooth. (For iOS 8, you can also swipe up from your home screen to bring up a miniature settings menu, and click the Bluetooth icon from there.) Then turn on Handoff on all of your devices: on your Mac, go to System Preferences > General > Allow Handoff between this Mac and your iCloud devices; on iOS, go to Settings > General > Handoff & Suggested Apps > Handoff.
Tip: To save your iOS device’s battery life, turn off Bluetooth when you’re not using Handoff.
6. Share your screen with other Macs
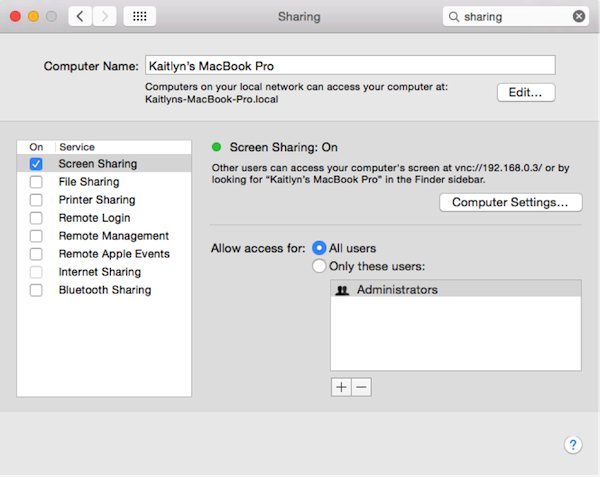
Sadly, you can’t always take your Mac with you— or can you? With Yosemite’s built-in screen sharing feature, you can now connect to another Mac on your network and display its screen on your Mac. So if you need to collaborate with coworkers on a project or show your in-laws how to change their Facebook privacy settings, now you can!
First, grant the other Mac permission to view your screen. This allows its user not only to see what you see but to control your cursor as well. To share your computer screen on someone else’s Mac, go to System Preferences > Sharing > Screen Sharing. (If Remote Management is checked, uncheck it first.)
Next, specify who can share your screen; choose “All Users” if you want anyone with a user account on your Mac to share your screen, or select “Only these users” to restrict screen sharing to specific users. (When setting up usernames and passwords, make sure you use the same Apple ID on both Macs.) A third option is to allow anyone (even without a user account) to share your screen by clicking on “Computer Settings” on the right side and selecting “Anyone may request permission to control screen.” With this option selected, computer users can ask for permission instead of entering a username and password.
After you’ve shared your screen, you can find it again by opening the Finder window. Under the Shared section of Finder’s sidebar, select the computer you want to access and click Share Screen. You’ll be prompted to connect. You can connect as a “Guest” (you can view the screen but can’t control it); “By asking for permission”; “As a registered user” (only those approved under the “Only these users” category previously mentioned); or “Using an Apple ID” (by providing a valid login name and password approved in “Only these users” or “Users & Groups” categories).
Tip: If you can’t share computer screens, make sure both Macs are connected to the Internet or same network. If it still doesn’t work, make sure neither Mac is in sleep mode. You can adjust these settings by going to System Preferences, then Energy Saver.
7. Share apps, movies and music with family members—for free!
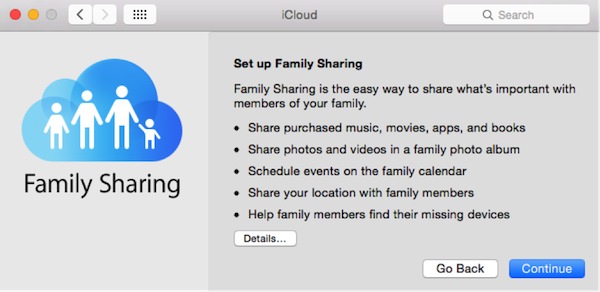
Did your spouse purchase an e-book you wanted, and you don’t want to shell out another $7.95 for your own copy? Do you constantly ask your siblings to burn you an old-school duplicate of the latest album they downloaded from iTunes so you can rip the music onto your iPhone? Thanks to the introduction of Family Sharing, dilemmas like these are relics of the past.
Family Sharing allows up to six people to share their App Store, iBooks Store and iTunes Store purchases. The new digital dynasty can even add events to a Family calendar, share photos and videos in the new Family photo album, add reminders to the Family shared reminder list and locate one another’s misplaced Apple devices with Find My iPhone and Find My Mac.
To get started, a family member dubbed the Family Organizer invites the others to join the group and agrees to pay for each group member’s purchases once they join the family. Just go to System Preferences > iCloud > Set Up Family, and enter your iCloud password when prompted and follow the on-screen directions to add your family members.
To add members, enter the name or email address of the person you want to invite to the group. (Adults must have an iCloud account to be added to the group.) To add an account for a minor, select “Create an Apple ID for a child who doesn’t have an account,” click Continue and follow the on-screen prompts. The new members will be asked to confirm the Apple IDs they use for their App Store, iBooks Store and iTunes Store purchases. Afterward, purchases made by the family members will be automatically available to the group.
Tip: You can only be part of one family at a time, and you can only switch families once per year.
You can require that minors request approval from you or another adult before purchasing free or paid content. Just go to System Preferences > iCloud > Manage Family, select a child from the left side and turn on the “Ask to Buy” button on the right. (These age restrictions vary by area, but in the United States, they can be enabled for anyone who’s under 18, and they’re enabled by default for anyone under 13.) On the same screen, you can add a parent or guardian to approve purchases. Just select an adult on the left side and turn on the “Parent/Guardian” button on the right. Purchase requests will pop up in real time in the top right corner of your screen, so you can approve them on the spot or snooze the request for later. You can respond to a postponed request by locating it in your Notification Center.
To access Family Sharing content, go to the Purchased section of the App Store, iBooks Store or iTunes Store. Click on the family member whose collection you want to view, and download or play the items as you like.
But say you’ve just downloaded an explicit music album that you don’t want your preteen to hear. You can still keep that private. Just sign in to iTunes and click on your name to the left of the search field. Then select Purchased and highlight the type of content you want to hide, such as Music or Books. Hover over the exact content you want to hide, and click the X that appears over it. You can hide individual iTunes, App Store and iBooks Store purchases.
Tip: The family organizer is billed directly for all Family Sharing purchases, but if a family is ever disbanded, the original member who made the purchase keeps the items they chose to purchase.




From Kelly Lee Brosky on November 04, 2014 :: 3:00 pm
I’m on an iMac running Yosemite 10.0, I have Bluetooth 4.3 on it and have an iPhone 5s. I’ve turned on Bluetooth on both devices and both are on the same WiFi. I’ve also actived Handoff on my iPhone but I cannot locate the icon to active it on my Mac. I looked all around System Preferences and it is not in the General tab as I’ve seen above. I tried doing a Spotlight search and it didn’t locate it either. HELP!
Reply
From Kaitlyn on November 14, 2014 :: 10:49 am
Kelly, I’m sorry you’re having issues with Handoff. Did you make sure you’re signed into iCloud with the same Apple ID on both your Mac and iOS device first? (Also, is your iPhone software up to date?) Do that, and then turn on Bluetooth and Handoff for both devices following the steps mentioned in the article. Then test out Handoff by writing a new Note from your iPhone, and then check your Mac to see if the Handoff icon appears in the Dock.
Reply