We may earn commissions when you buy from links on our site. Why you can trust us.
Review of the Epson FastFoto FF-680W
Let's face it. The process of digitizing photos is mind-numbingly slow: the laying of each photo on the scanner and waiting the agonizing minutes for each to be scanned, then saving each photo. And many of these photos are likely faded or discolored so you'll want to do at least some minimal enhancements. Facing this tiresome time-consuming task keeps those old photos stuck in their drawers and shoeboxes. But not anymore.
Epson's new (and aptly-named) FastFoto FF-680W ($599.99 on Epson, check price on Amazon) is so fast and easy, it makes digitizing photos fun. You simply place up to three dozen 3.5x5, 4x6 or 5x7 prints into the top of the scanner and, literally a minute later, all are fed-through, scanned, enhanced, file-named and safely stored in a file folder of your choosing on your computer's hard drive, or even upload to your Dropbox or Google Drive account.
I am not exaggerating about the entire three-dozen photo scanning process taking only a minute. Check out the video below, which depicts the scanning, saving, enhancing and storing of three dozen 5x7 photos in less than a minute.
Bottom line: the Epson FastFoto FF-680W is so fast and easy to use, you'll actually enjoy scanning all your old photos to share with family and friends and store safely so that disaster, natural or otherwise, can't permanently destroy the memories they hold.
Ergonomics and set-up
Out-of-the-box, the Epson FastFoto FF-680W is a compact rectangular box, measuring a mere 11.8 x 8.7 x 8.1 inches and weighing just 8.8 pounds. It's designed so you can easily tote it to where your photos are instead of schlepping your photos to it, further encouraging you to use it. Once positioned where you want it, the FastFoto unfolds like a flower, its automatic document feeder top folding up, and its retrieval tray pulling out below.
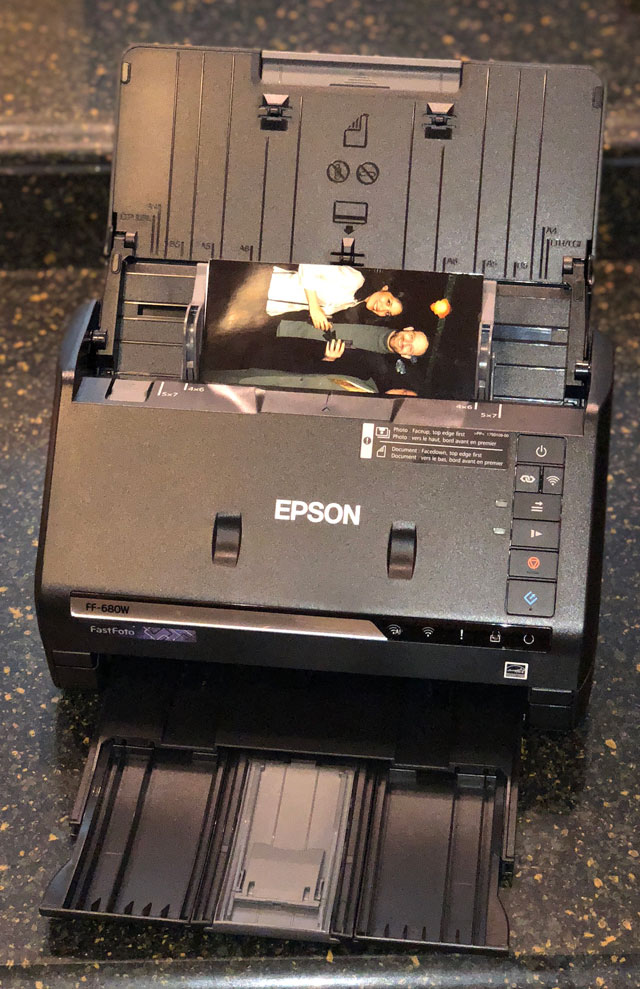
The FastFoto FF-680W is a substantial upgrade of the previous FF-640W. On the hardware side, the 680W adds Wi-Fi connectivity, the ability to scan more photos in one load, scanning of a wider variety of photos such as Polaroids and panoramic and scans at higher resolution and in TIFF format. The 680W also now auto orients photos and has OCR capabilities for scanning documents for use in word processing programs.
You connect FastFoto to your laptop or PC via an included USB cable or via Wi-Fi. I did have some trouble getting the FastFoto to pair with a dual-band mesh Wi-Fi system, so I connected via my cable modem router's 2.4GHz Wi-Fi network instead.
While I managed to find and download the FastFoto PC software and pair my laptop to the scanner via Wi-Fi, the process was not nearly as simple or clear as it ought to be. The software isn't on the web page indicated in the included (and confusingly multi-language) one-sheet start guide, and it turns out there are two are separate pieces of software, Epson FastFoto and Epson ScanSmart. FastFoto is used for scanning photos and ScanSmart is used for scanning documents. I only discovered there was a separate downloaded version of ScanSmart when I couldn't find any document scanning settings in the FastFoto software.
During setup, you'll have to update the scanner's firmware and software, restart your computer and figure out which button is the "Start" button, which is not clearly labeled (it’s the angled "E"-like key toward the bottom). The whole process seemed just a bit convoluted, but I got through it.
I suggest accessing and reviewing the online FastFoto manual before getting started. This is advice I wish Epson would have offered since the manual provides a plethora of useful information and guidance on FastFoto's myriad set-up, capability and maintenance options.
Using the FastFoto FF-680W
FastFoto's Wi-Fi is one of the major upgrades over the previous FF-640W scanner. A Wi-Fi connection means the FastFoto need not be adjacent to your PC, further increasing the flexibility of your scanning location.
But, I found FastFoto's Wi-Fi connection to be a bit finicky and scanning slowed considerably. Those 36 photos took six-and-a-half minutes just to scan (before processing) via Wi-Fi versus just under a minute. When I reported this issue to Epson, the company asked if I had "many other devices sharing the same Wi-Fi network or running through a hotspot instead of a router." Yes and no. My apartment is flooded with Wi-Fi from a variety of mesh network routers and smart home devices, so my poor Wi-Fi experience is likely not typical. My advice: try the Wi-Fi connection first with a half dozen photos. If the FastFoto doesn't scan as fast (or nearly as fast) as in the video, you can just plug in the USB cable, which auto-disables the Wi-Fi link. Either way, though, is faster than one-by-one scanning on a flatbed scanner.
Once you figure all this out, scanning is an absolute breeze. You load your photos in the automatic document feeder – and you can mix standard sized photos together. Hit the "Settings" button in the upper right-hand corner of the screen to tell the scanner the following:
- Where to store your photos ("Organization"),
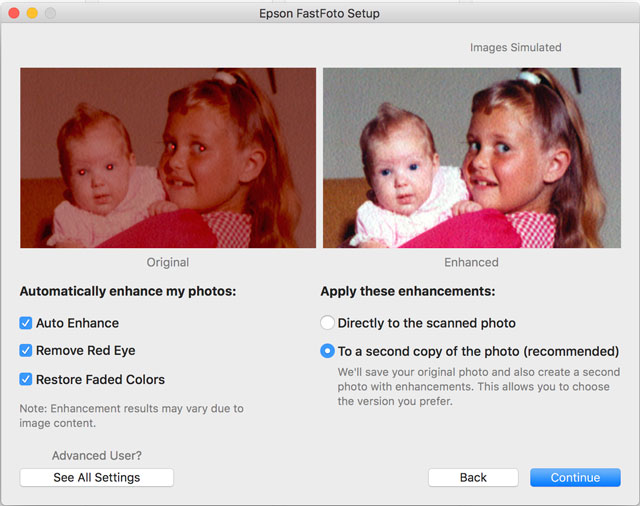
- Whether you want to enhance your photos and how ("Enhancements")
- Whether you want to keep both the original and the enhanced version.
- If you want your photos uploaded to Google Drive or Dropbox ("Upload")
- What size photos you're scanning
- The resolution – 300 dots per inch (dpi) for fastest scanning, 600dpi for archival and 1200dpi in case you plan on making billboards or need to crop a tiny portion of the photo
- If you want the rear of the photo scanned as well ("Scanner Settings")
- Choose between saving the photo as a JPEG or TIFF
- Set the sensitivity for detecting any notes or printing on the back of the photo so the scanner won't scan blank behinds
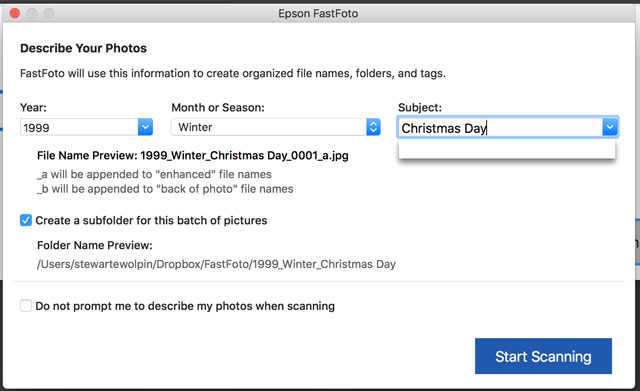
Once you have checked your settings, press the scan button (either on the FastFoto scanner or in the software). You then get a screen with a field for the year in which the photos to be scanned were taken, a pulldown menu indicating which season or month, and a blank field to fill in a label for the group of photos such as "Vacation" or "Wedding." Each photo file name will bear this label; the software automatically assigns and adds file numbers to this label.
Then hit "Scan," sit back and enjoy the action. As noted, scanning, enhancing, processing and storing 36 photos takes just around a minute. Forgive me, but I'm still stunned by this speed, and I'm usually a cynical cuss when it comes to tech. Scanning the same 36 pics at 600dpi takes three times longer – three minutes and change – while a 1200dpi scan takes nearly 10 minutes. All of these results are faster than scanning each one-by-one on a flatbed scanner. Once the batch is done, you can either load in another 36 while maintaining the same settings and storage folder, or end the scanning and start the processing.
As far as resolution is concerned, a 5 x 7 photo scanned at 300dpi creates a 2053 x 1180 pixel file, while at 600dpi you get a 4124 x 2360 image, and a 1200dpi scan results in an 8276 x 4710-pixel result. By comparison, an iPhone X creates a 4032 × 3024 image, so 600dpi is probably the best all-around option.
Each scanned photo loads into the FastFoto software window. Epson's enhancement function visibly brightens, color corrects and adds contrast to each photo, which you can see in the original/enhanced comparison samples, which saves a ton of photo enhancement work and time later.

The software adds the letter "a" to the file name of the enhanced scan, and a "b" for a scan of the rear of a photo, so you know which file is which. Within the FastFoto software window, you also can correct individual photo orientation – the software usually detects the difference between a landscape (wide) and portrait (tall) and orients each appropriately. But the software occasionally misses a few (and sometimes you load a photo upside down), but you can rotate wrongly oriented photos left or right, as well as correct for red-eye.
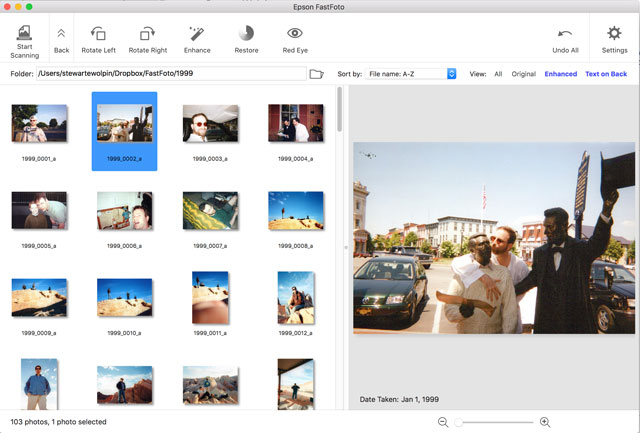
All-in-all, FastFoto performs everything quickly and proficiently to digitize your stash of aging snapshots. Organizing your physical photos before you scan will undoubtedly take longer than the actual scanning process. But even with this pre-scan sorting, you'd likely be able to scan your entire photo collection, hundreds of photos, in an hour or two. Once you scan your photos, you can fold up and store the scanner safely away, or lend it to family or friends.
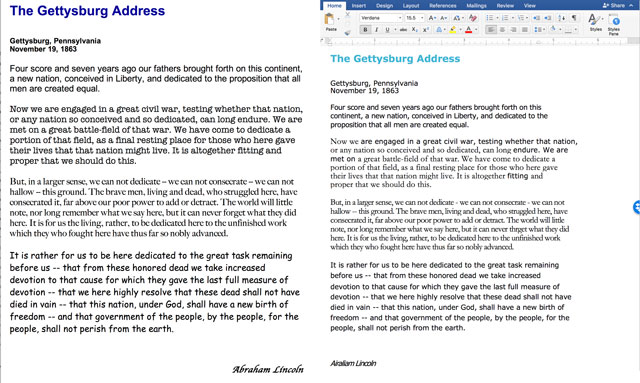
FastFoto scans more than just photos, it can also scan documents and optical character read (OCR) them if you want to edit them with Microsoft Word or another word processor. To test the feature, I scanned a copy of the Gettysburg Address that I created using a variety of fonts. FastFoto transformed the scan into a Microsoft Word document, even attempting to duplicate the varying typefaces I used. It had trouble only reading Lincoln's name in the fancy Apple Chancery font. So if you regularly need printed matter turned into editable text, the FastFoto performs admirably.
The bottom line
Yes, FastFoto is pricey, especially considering you likely won't need it much after you've scanned all your old photos. But the time you'll save scanning your photos individually on a flatbed scanner and the satisfaction you'll get once you've safely scanned, enhanced and stored all your old photos, can hardly be valued. I wish the set-up was smoother and the separate software situation was made clearer, but these are minor quibbles. Considering how long I've yearned to add all my pre-2000 print photos to my digital photo collection and dreaded doing so on a flatbed scanner, it's hard to describe just how grateful I am to Epson for the FastFoto FF-680W ($599.99 on Epson, check price on Amazon).
[Image credit: Stewart Wolpin/Techlicious, Epson]
Discussion 
I am looking for a scanner that can do slides, and save them to a drive. I also have 35mm color negatives to scan. Actual pictures are the last thing on my list to scan. What product would I look at to take care of the huge slide collection and the negatives.
Thanks
The Plustek OpticFilm 8200i Ai is specifically designed for slides and negatives and gets excellent ratings from users. It’s on the pricier side, but worth it if you have a lot to scan.
I have had this problem, and the solution was to use a digital SLR camera coupled with some sort of contraption.
I used a Polaroid Slide Duplicator, and for the neagtives an adapter.
I saved A TON of time, and, depending on your dSLR, the quality is mora than enough. Also, the camera RAW files are smaller than the negative scanners TIFF equivalent, so a win there also.
Good luck!
After using this scanner for a year I have found that the scanner is brilliant, the software really sucks. This is what I don’t like about it ...
Updater annoyances
A nag screen pops up every day to tell you to check for software updates. It gives you the option to turn off the ‘automatic update” check but you can’t because there is no button in the software that you can later click to check for updates.
The updater pops up in the middle of a scan with no option to update later
The updater does not tell you what the changes are. If the changes are to make it run better on a Mac and you’re not using a Mac - tough shit, you’re still stuck with a painfully slow hundreds of MB update.
Beware: The updater changes ALL your settings back to their defaults eg: the resolution you were scanning with (300dpi, 600dpi etc), whether you’re scanning to TIFs or JPGs, the folder you save your photos into etc. So when you resume your interrupted scan after the update your photos will be sent to a different folder with a different naming scheme and all the wrong settings. All the other defaults such as “Red Eye Removal” will be reactivated – turn this OFF, it takes FOREVER and does a really crappy job. Why doesn’t Epson just save your settings and reapply them after the update? Who knows!!!
When the update is complete it then CHECKS FOR ANY UPDATES and surprise surprise reports that YOUR SOFTWARE IS UP TO DATE
FastFoto software annoyances
No capability to scan Black and White photos in grayscale. All B&W photos are color scanned resulting in unnecessarily huge photo sizes
No capability of saving the back side of the photos in a lower resolution or type
eg: When scanning as TIFs at 600dpi in color the back is also scanned the same way with no option to save it as a 300dpi B&W JPG which would significantly reduce its size
The FastFoto software truncates filenames longer than 40 characters so you can’t name a file “Granny Peterson in the old Hillcrest Hospital “– I had to manually complete my filenames later in Windows Explorer, a real pain in the butt.
The Date option allows you to specify the year and the month BUT NOT THE DAY!!!! After your scanning is complete you will have to go back and manually edit the metadata of hundreds and hundreds of photos to show the correct date.
The FastFoto software numbers the scans in reverse order. I sent an email to Epson Support about this and their support technician did not know what I was talking about. I had to send her another email explaining reverse order scanning to her. Here is the explanation I gave her :—
Let me explain what’s happening. If I load photos numbered 1 to 5 into the scanner it gives them the numbers 5 to 1. ie: in reverse order.
This is not a problem as I can just load the photos in reverse order and then they will be numbered correctly.
This is the problem …
Fastfoto has no way of knowing how many photos there will be in the batch so it has to wait until the entire batch of photos has been scanned before it can number them.
This means I don’t see the photos displayed on screen until the entire batch has been scanned, which could be 200 photos or more.
If there is a problem (eg streaks on the photos) I don’t find out about the problem until the entire batch of photos has been scanned. I then clean the scanner and have to rescan the entire batch of 200 photos again!!!
This is what I would prefer to happen …
Scan a photo, number it, display it onscreen immediately.
Scan the next photo, number it, display it onscreen immediately.
Continue in this manner until the entire batch of 200 photos or more has been scanned.
This way, if there is a problem I see it immediately, I can stop the scan, rectify the problem and then continue scanning.
This is part of the reply Epson fobbed me off with :—
There is no workaround for this as that is how the software was designed to work, and our software developers are not going to redesign it to work differently as that would cause mass confusion with the hundreds of thousands of customers already used to the way it currently works.
What a load of rubbish!!! It never worked that way on the Epson FF-640 and in any case a simple checkbox for us to tick to decide whether or not we wanted to use reverse numbering is all it would take and therefore there would be no “mass confusion with the hundreds of thousands of customers already used to the way it currently works”.
















From Cathy Jones on April 28, 2019 :: 3:10 am
I bought one of these Epson FastFoto’s to catalogue my old photos. It worked fine for the first 10 packets (if you like super grainy photos), then it has been problem after problem. The software has had to be installed 4 times and it still will not work properly. A blank button comes up after the photos have passed through the scanner, pressing it does absolutely nothing. There is very little trouble shooting help available for this product. I think it is a big fail.
Reply