Tech Made Simple

Hot Topics: How to Fix Bluetooth Pairing Problems | Complete Guide to Facebook Privacy | How to Block Spam Calls | Snapchat Symbol Meaning

We may earn commissions when you buy from links on our site. Why you can trust us.

author photo

Make Important Email Standout in Outlook with Color Coding

by Suzanne Kantra on April 22, 2024

Updated on 4/22/2024 with information and instructions for New Outlook.

Are you tired of constantly sifting through your crowded inbox, trying to find that important email from your boss or a critical update from a family member? Microsoft Outlook offers a feature that allows you to color-code your emails, making it easier to identify and prioritize messages from specific contacts or other criteria.

Outlook's color coding is based on rules that you set up to highlight emails with a specific color when they arrive. For instance, you could set up a rule that emails you receive from your boss will appear in green.

How those colors appear in your inbox will vary slightly based on which version of Outlook you have. In earlier versions of Outlook, which Microsoft calls "Classic Outlook," the subject line will appear in a green font. In the most recent version of Outlook, which Microsoft calls "New Outlook," a green tag will appear in front of the subject line text.

While there are a few steps to go through to set up your color-coding rules, the process is straightforward. Check out the steps below for color-coding your emails in New Outlook, Classic Outlook, and the even older Outlook 2019 below.

Color coding emails in New Outlook

New Outlook comes pre-loaded on new Windows 11 computers, and you can use the basic software for free. However, color-coding with Rules is only available if you have a paid subscription to Microsoft 365.

  1. Go to View tab.
  2. Select View Settings.
  3. In Settings, select Mail and then Rules.
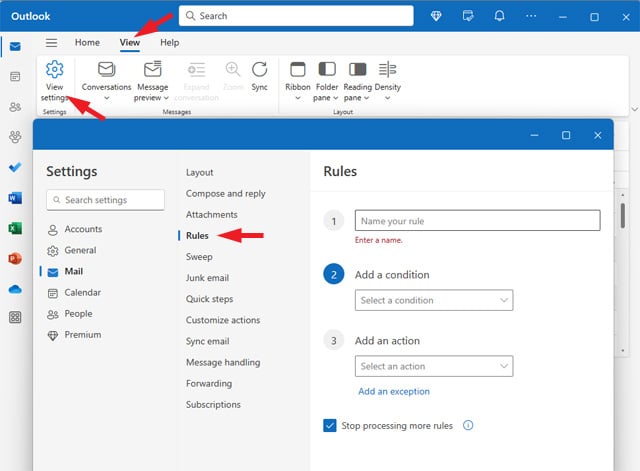
    Screenshot of the New Outlook with the View, View Settings, and Rules options pointed out.

Within the rule creation window, you have a few options for defining how your color rules will operate.

Add a condition to trigger your rule

In the Add a condition dropdown, you can color code your emails based on a number of different criteria, everything from who the email is from to the subject line or specific keywords.

Add an action

The Add an action dropdown provides all your choices for what to do with an email when it meets your set condition. To color code your emails, select Categorize. From the dropdown menu on the right, choose an existing category color or select New Category to create a new color tag (a window will open for creating the category, but it may be annoyingly hidden behind the Settings window). I highly recommend creating a new tag with a meaningful name so you can easily see both the name and color of the tag when scanning through your emails.

Choose whether to stop processing additional rules

Rules will be applied starting with the newest rule. There may be times you don't want multiple rules applied to an email. For example, you may want to color code emails from your boss with as red, but you wouldn't want a later rule triggered that sends all emails with embedded images to your spam folder. In this case, keep the box checked for Stop processing more rules.

Click the Save button to finish setting up your rule.

Below, you will see examples of a red "Important" tag and a green "Work" tag next to the subject line based on rules I created.
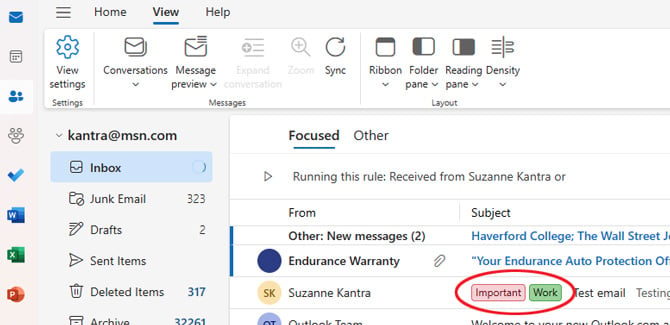
The New Outlook color coding show up as colored tags.

Read more: Don't Panic! A Step-by-Step Guide to Retrieving Unsaved Word Files

Color coding emails in Classic Outlook

  1. Go to the View tab.
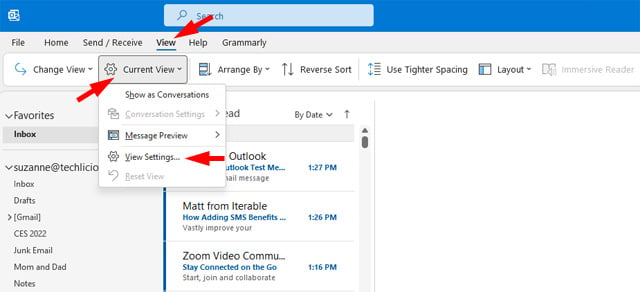
  2. Select Current View.
  3. Select View Settings.

    Outlook View tab with Current View selected and View Settings in the pull-down menu pointed out.
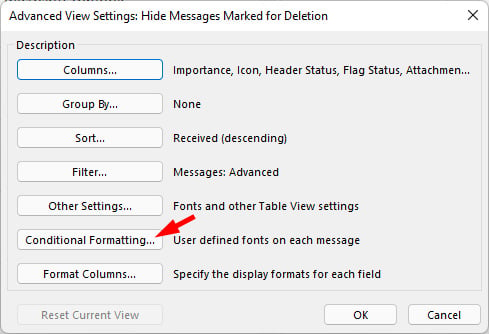
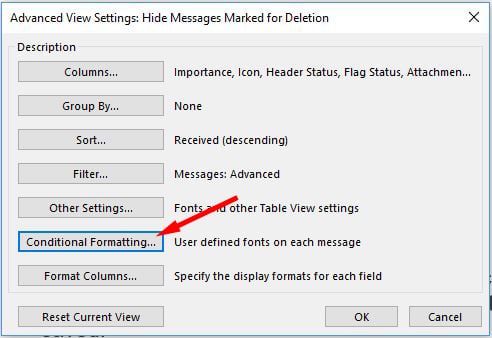
  4. Choose Conditional Formatting.

    Outlook 2021 Conditional Formatting pop up box with options for Columns, Group by, Sort, Filter, Other Settings, Conditional Formatting (pointed out) and Format Columns.
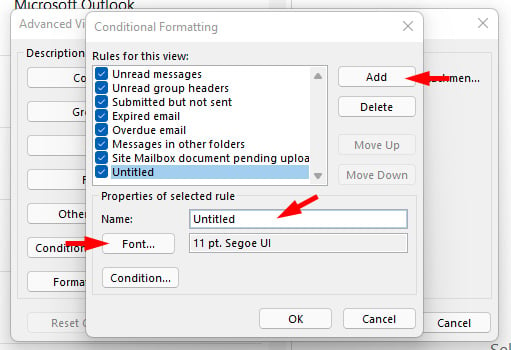
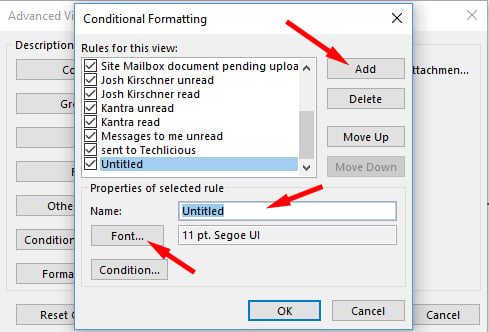
  5. Click Add.
  6. Name your rule.
  7. Click on Font.

    Conditional Formatting pop up box showing the option to Add a new rule in the top right. Below the box entitled Rules for this view, you see Properties of selected. In that section you see Name next to a box with the word Untitled highlighted and pointed out. Below that is button with the word Font (pointed out) and a box with the font name and size. Below that is a button entitled Condition.
  8. Pick a color, style and size and click OK.
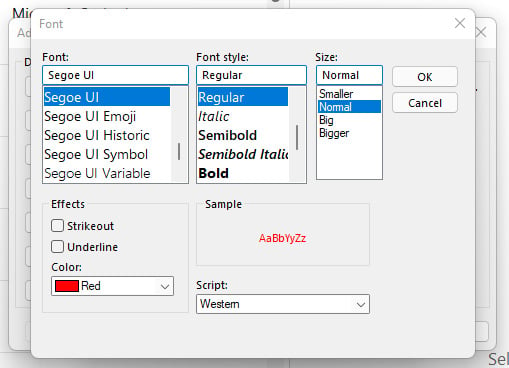
    Outlook Font selection a box for the font (with font name below, Segoe UI highlighted), Font stye with options below (Regular highlighted) and Size (Normal highlighted). Below are Effects you can apply including strikeout, underline and Color (Red is selected) and a box next to it entitled Sample shows how the text will appear.
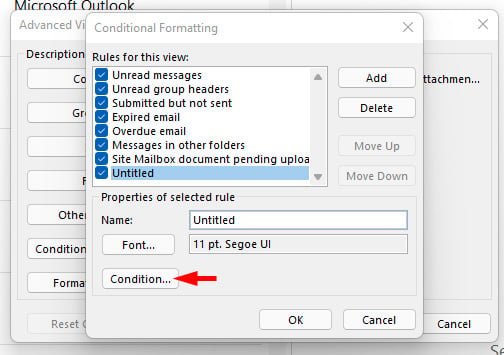
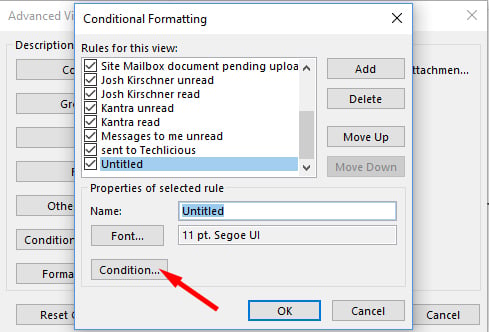
  9. Click on Condition

    Conditional Formatting pop up box showing the option to Add a new rule in the top right. Below the box entitled Rules for this view, you see Properties of selected. In that section you see Name next to a box with the word Untitled highlighted. Below that is button with the word Font and a box with the font name and size. Below that is a button entitled Condition (pointed out).
  10. Type in the email address of the sender or senders you want to highlight. For multiple people, separate the email addresses with a semicolon. And, if you want all emails from a particular company with a unique domain name, you can use the "@" domainname.com. For example, Techlicious would be: @techlicious.com. Then select OK.
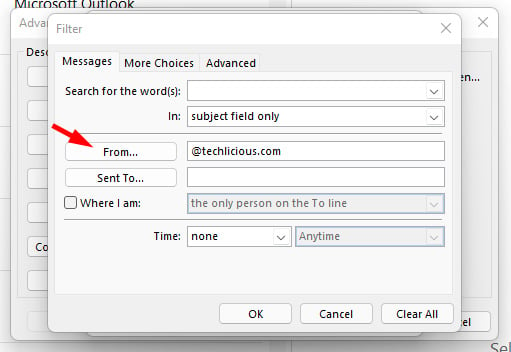
    Outlook 2021 conditional formatting Filter box. Showing the Messages tab with boxes for Search for the word(s), In (with subject field only selected). In the next section the is a From button with a box next to it with @techlicious.com, below is a sent button with an empty box next to it. Below is an option to click Where i am and the option to be the only person on the To line.

Here's how email will appear if you assign red to a contact.
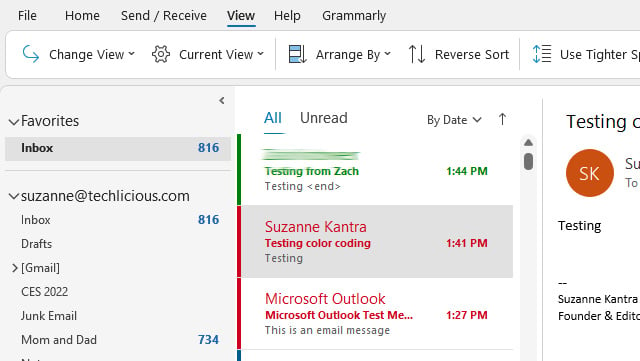
Outlook 2021 with View tab open showing the Inbox. On the right is a list of messages. There is a green message and then two red message.

If you want to apply this color coding to all of your email folders, go to:

  1. View.
  2. Change Views.
  3. Apply Current View to Other Mail Folders.
  4. Select the folders where you want the conditional formatting. There's a box at the bottom that lets you choose to Apply view to subfolders so you'll be covered if you create new subfolders.
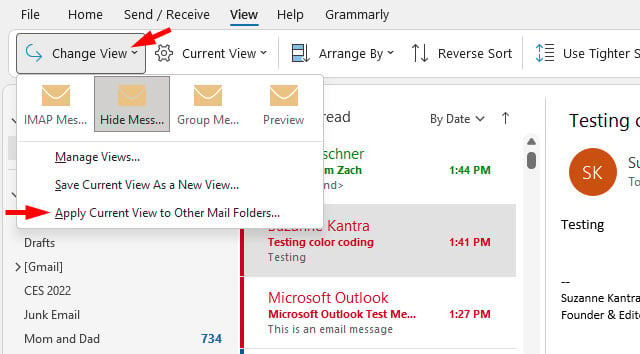
Outlook 2021 screenshot of View tab. Shows Change View selected and the pull down menu with the option to Apple Current View to Other Mail Folders

Read more: How to Switch Email Accounts Without Losing Emails

Color coding emails in Outlook 2019

  1. Go to the View tab.
  2. Select View Settings.

    Outlook View tab with Current View selected and View Settings in the pull-down menu pointed out.
  3. Choose Conditional Formatting.

    Outlook 2016 Conditional Formatting pop up box with options for Columns, Group by, Sort, Filter, Other Settings, Conditional Formatting (pointed out) and Format Columns.
  4. Click Add.
  5. Name your rule.
  6. Click on Font.

    Conditional Formatting pop up box showing the option to Add a new rule in the top right. Below the box entitled Rules for this view, you see Properties of selected. In that section you see Name next to a box with the word Untitled highlighted and pointed out. Below that is button with the word Font (pointed out) and a box with the font name and size. Below that is a button entitled Condition.
  7. Pick a color, style and size and click OK.
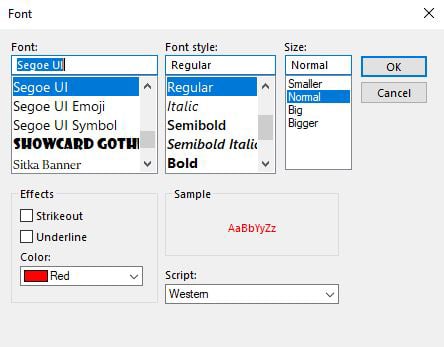
    Outlook Font selection a box for the font (with font name below, Segoe UI highlighted), Font stye with options below (Regular highlighted) and Size (Normal highlighted). Below are Effects you can apply including strikeout, underline and Color (Red is selected) and a box next to it entitled Sample shows how the text will appear.
  8. Click on Condition.

    Conditional Formatting pop up box showing the option to Add a new rule in the top right. Below the box entitled Rules for this view, you see Properties of selected. In that section you see Name next to a box with the word Untitled highlighted. Below that is button with the word Font and a box with the font name and size. Below that is a button entitled Condition (pointed out).
  9. Type in the email address of the sender or senders you want to highlight. For multiple people, separate the email addresses with a semicolon. And, if you want all emails from a particular company with a unique domain name, you can use the "@" domainname.com. For example, Techlicious would be: @techlicious.com. Then select OK.
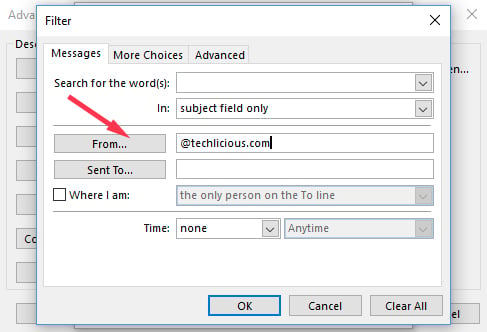
    Outlook 2016 conditional formatting Filter box. Showing the Messages tab with boxes for Search for the word(s), In (with subject field only selected). In the next section the is a From button with a box next to it with @techlicious.com, below is a sent button with an empty box next to it. Below is an option to click Where i am and the option to be the only person on the To line.

Here's how email will appear if you assign red to a contact.
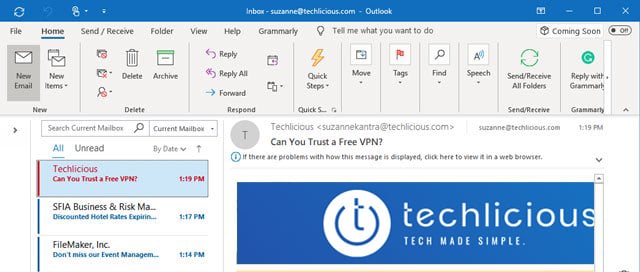
Outlook 2019 with View tab open showing the Inbox. On the right is a list of messages. There is a green message and then two red message.

If you want to apply this color coding to all of your email folders, go to:

  1. View.
  2. Change Views.
  3. Apply Current View to Other Mail Folders.
  4. Select the folders where you want the conditional formatting. There's a box at the bottom that lets you choose to Apply view to subfolders so you'll be covered if you create new subfolders.
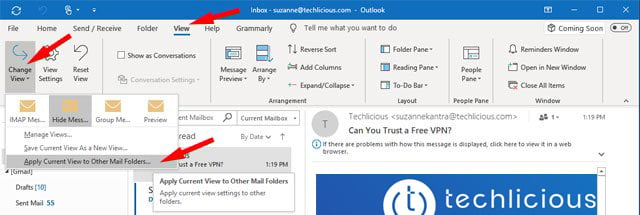
Outlook 2019 screenshot of View tab. Shows Change View selected and the pull down menu with the option to Apple Current View to Other Mail Folders

[Image credit: important email concept via BigStockPhoto]

For the past 20+ years, Techlicious founder Suzanne Kantra has been exploring and writing about the world’s most exciting and important science and technology issues. Prior to Techlicious, Suzanne was the Technology Editor for Martha Stewart Living Omnimedia and the Senior Technology Editor for Popular Science. Suzanne has been featured on CNN, CBS, and NBC.


Topics

Computers and Software, Software & Games, Productivity, Tips & How-Tos, Tech 101


Discussion loading

gravatar

From James Eliot on January 18, 2011 :: 12:15 pm


Given that macs make up the majority of computers for early adopters, and an even higher percentage for female early tech adopters, you might note that the color coding of email works easily in Mac Mail as well. 

Merely go to Mail > Preferences > Rules and add a rule that assigns a color to specific senders as you designate.
Keep up the good work.  By the way, I really liked the daily coverage of CES.

Reply

gravatar

From Paco V. on February 12, 2012 :: 3:12 am


Outlook from mac does not appear to have an option to modify colors, nor modify fonts under rule actions.

I have not been able to “merely” go to Mail > Preferences > Rules and add a rule that assigns a color to senders, recipients, etc…

Are there extra steps or commands that might be missing?

-PV

Reply

gravatar

From Cynthia Tews on September 30, 2014 :: 3:12 pm


Outlook is so unintuitive, I could not for the life of me figure out how to color code. Your article was the only thing that helped me!

Reply

gravatar

From Cynthia H on April 01, 2016 :: 12:38 pm


great instructions…made this task very easy! Thanks

Reply

gravatar

From Jacob T on July 14, 2016 :: 11:28 pm


I occasionally get an email in Outlook that stands out by its red color, as opposed to all the emails in the list that are plain black.  How can I send an email that will show up on the receivers side in red color ?

Reply

gravatar

From Josh Kirschner on July 15, 2016 :: 9:44 am


The color coding in Outlook is controlled by the receiver of the messages (based on their Outlook settings), not the sender. If you are seeing messages in red, it may because they were sent as “high priority”. You can check your own Outlook settings to see which messages default to red on your end and, perhaps, your recipient will have it set up the same way. Also, this only applies to Outlook. If the person is reading those messages on a mobile device or via the web (e.g., Google Mail), settings will be different.

Reply

gravatar

From John on March 03, 2021 :: 11:32 am


Good article but am still trying to figure out if coloring the different folders in my Personal Folders is possible.

I would like to differentiate the Customer folders, personal, vendors, etc by color to make folders easier to find.

Is this possible?

Reply

gravatar

From JJ on July 13, 2022 :: 3:36 pm


Can you please let me know if anyone answers this?

Reply

gravatar

From Jill on January 31, 2017 :: 12:00 pm


I went through all these steps and even rebooted my system and the color code rule is not working. Any additional tips? Should I select Reset View to make the change occur?

Reply

gravatar

From Suzanne Kantra on February 23, 2017 :: 6:08 pm


I just went through the process again with Outlook 2016 and it works the same. Just make sure you click “ok” on all of the boxes.

Reply

gravatar

From Yunus on October 30, 2017 :: 3:14 am


In Outlook2010 I want to select random emails to be different colours so I can go back to them later. How can I do that? And can I then filter based on colour?

Reply

gravatar

From jatinkg on April 12, 2017 :: 6:03 am


You can effectively do it using ‘Change View settings’ button from View menu. Bingo!

Reply

gravatar

From Liz on June 02, 2017 :: 8:44 am


Our company is mostly PCs so these instructions will work for them, but we have 6 Mac users and these directions don’t work for the Outlook 2016 for Mac.  Can you write up directions for that?  Thanks!

Reply

gravatar

From J on June 29, 2017 :: 12:43 pm


I was wondering if there is any way to get the color coding to show up on the Iphone app view??

Reply

gravatar

From Patrick on July 05, 2017 :: 11:43 am


Is there a way that I can decide? If I get 15 emails from the same person and only 1 is important enough to be flagged, that’s the only one I want highlighted, bold, Arial, with a 16 pt font size, can I make a menu item to do so?

Reply

gravatar

From Mary on July 25, 2017 :: 10:02 am


I tried to follow the directions.  On the advanced View Settings: Compact dialog box, I choose conditional formatting; I then identify a few people I want to receive in a different color, hit ok.  their names appear in the Filter section of the dialog box.  I want to add more names but will they all appear?  Your screen shot just says “advanced” in the filter section.

thanks

Reply

gravatar

From Mary on July 25, 2017 :: 10:05 am


and I just had to clear everything I did in previous message as my inbox disappeared.  I guess what I did was to only have emails from certain people appear. 

so, I am missing something.

Reply

gravatar

From KJS on August 02, 2017 :: 12:44 pm


THANK YOU!!!

Reply

gravatar

From Victor on February 13, 2018 :: 11:59 pm


I’m having issues prioritizing rules that may overlap. For instance, I have the default “unread messages” rule set to have the font in red. However, I also have a rule for messages sent only to me (and CC: and BCC: being set to “empty”) to be green.

So, when I receive an email sent only to me but it’s unread, it defaults to green. I want unread messages to first prioritize to red (even if only sent to me). I can’t seem to select the “move up” or “move down” buttons (they are greyed out- is it possible these have been deliberately restricted?).

Reply

gravatar

From Suzanne Kantra on March 13, 2018 :: 9:19 am


There are a few rules at the top of the list in the “Conditional Formatting” section that you can’t move. If you uncheck the default “Unread Messages” rule and then add your own new rules. You can reorder rules that you create. Here’s the order that worked for me:

1. Unread Messages from specific person 1 (make sure you go to the “more choices” tab and check off “Only items that are:” and make it “unread”)
2. Messages from specific person 1 (do not go to the “more choices” tab and select anything for “Only items that are:”)
3. Unread Messages (the new one I created)

Reply

gravatar

From Todd on October 26, 2022 :: 12:33 pm


when I have a gray teamed background I have new messages come in green , when i change the back ground to black i no longer get those messages in green, they are in gray. however setting indicated they should still be coming in green. THanks for any help

Reply

gravatar

From Karen CN on February 27, 2018 :: 10:07 pm


Hi, this is a real late response. I was struggling with mine as well and then I read that after the email, you must place semi colon and the first and last name…
.(JavaScript must be enabled to view this email address); john doe
that did the trick for me!

Reply

gravatar

From Holly on February 08, 2022 :: 12:12 pm


Thank you! Semi colon with name did it. smile

Reply

gravatar

From Robi on February 10, 2022 :: 8:00 pm


If I could move your comments to the top of this thread I would.  I have been working on this for 30 minutes trying to get it to “stick”.  Thanks Karen!


RR

Reply

gravatar

From Tina Abbott on March 09, 2018 :: 6:06 am


When i add additional rules for another email and colour it does not do it.

Reply

gravatar

From Suzanne Kantra on March 13, 2018 :: 9:43 am


Adding Rules for Multiple People:
There are a few rules at the top of the list in the “Conditional Formatting” section that you can’t move. If you uncheck the default “Unread Messages” rule and then add your own new rules. You can reorder rules that you create. Here’s the order that worked for me:

1. Unread Messages from specific person 1 (make sure you go to the “more choices” tab and check off “Only items that are:” and make it “unread”)
2. Messages from specific person 1 (do not go to the “more choices” tab and select anything for “Only items that are:”)
3. Unread Messages from specific person 2 (make sure you go to the “more choices” tab and check off “Only items that are:” and make it “unread”)
4. Messages from specific person 2 (do not go to the “more choices” tab and select anything for “Only items that are:”)

[add rules in pairs like the above, with the unread rule first and the general rule second.]

5. Only at the very end, add a rule that you create for Unread Messages.

Reply

gravatar

From Catherine on March 15, 2018 :: 8:04 pm


Thanks for the info.
I am trying to colour code messages that I have sent to specific people but just can’t get it to work. I have successfully colour coded messages from specific people with various colours.
Is this what the Sent To field is for?
Also, how do I make it colour code emails to multiple people at the same domain address? I have done this successfully for emails from a domain.
Thanks for your help

Reply

gravatar

From Suzanne Kantra on March 16, 2018 :: 1:11 pm


To color code sent mail items, you should select your sent mail folder, then go to View > View Settings > Conditional formatting. And then you are correct in that you should put the email address or domain in the “Sent to” field.

To color code for everyone at a specific domain, use the “@” before the domain. So for Techlicious, it would look like this:

@techlicious.com

otherwise, include the full email and separate recipients by a comma.

Reply

gravatar

From Paul on June 29, 2018 :: 5:41 pm


Hello,

I noticed that the color coding will only apply to the Main Inbox folder. How do I make it so that automatically applies to the sub-folder inboxes, I create, as well?

Reply

gravatar

From Chandra Shekhar on November 30, 2018 :: 4:11 pm


Thanks for the simple steps with screenshots. It works just fine.

Reply

gravatar

From Raj on December 12, 2018 :: 11:41 am


This helped. TY

Reply

gravatar

From MD40 on February 14, 2019 :: 2:33 am


Thank you for the tutorial on this subject. This was saved my time.

Reply

gravatar

From Guy on February 26, 2019 :: 10:26 am


Thank you for the simplicity, my workplace will be much easier the handle from now on

Reply

gravatar

From Steve S on March 20, 2019 :: 10:27 am


Thank you! One question - the coloring works perfectly. After I read a message, the color goes back to standard/whatever it was before, and I lose the highlight on the sender’s message, but would like for it to remain. How do I set that condition? Thanks for the clear steps by the way in this document. Have a great day.

Reply

gravatar

From Steve S on March 20, 2019 :: 10:37 am


As an update; I found the answer to my own question just now, uncovered a conflicting rule on “Read” messages. Unchecked it and I’m good. So now my comment is just; THANK YOU!

Reply

gravatar

From Josh Kirschner on March 20, 2019 :: 11:11 am


Happy you found the advice useful.

Reply

gravatar

From zhu on May 03, 2019 :: 11:45 am


From this guide, I learnt how to set up conditional formatting for emails sent from my boss.

However, as I get emails sent to my boss with me in the CC list, how do I color code emails that is sent to him? And sometimes it may not only be his email statated in the ‘To’ box but containing several other recipients too.

In this case, will setting up two rules work? I tried it, but it does not work when say an email is sent to my boss and another person. It will not color code this email.

Reply

gravatar

From Jennifer Nickerson on August 01, 2019 :: 10:55 am


I wish that I could color code my file folders. I use them extensively to save emails and it would be a lot easier to drag emails to the correct file folder if the folders were different colors, even if they had to repeat a few colors, it would visually be easier to find.

Reply

gravatar

From Carole on September 26, 2019 :: 9:54 am


try folderico.com

Reply

gravatar

From Jennifer Nickerson on September 26, 2019 :: 10:20 am


Thank you Carole. This looks like a good program but it doesn’t seem to work within Outlook.

I know I can color code different senders in Outlook but I would like to be color coding my subject folders.

Reply

gravatar

From carole on August 06, 2019 :: 9:19 am


when i go in to try to add a name, there is no untitled box. help!!

Reply

gravatar

From Dawn on September 26, 2019 :: 9:48 am


Is there a limit as to how many conditional formatting rules (ie. assign colors to incoming emails) that you can add in Outlook 2007 or Outlook 365?

Reply

gravatar

From Carole on September 26, 2019 :: 9:56 am


Dawn, i have the same issue, if you find a solution please email and will do the same.

Reply

gravatar

From Josh Kirschner on September 26, 2019 :: 10:36 am


Outlook doesn’t have a set limit to the number of rules but, by default, the size limit of the rules in the mailbox is 64kb. This will probably translate into approximately 100 conditional formatting rules, but will vary based on the complexity of your specific rule set. For more info, see: https://support.microsoft.com/en-us/help/2622933/a-user-cannot-create-new-rules-in-outlook-or-outlook-web-app

If you are in a Microsoft Exchange Server environment, the rules size quota can be customized by the administrator to up to 256kb: https://support.microsoft.com/en-us/help/886616/some-rules-are-disabled-and-you-receive-an-error-message-when-you-try

Reply

gravatar

From Ferdinand on March 31, 2023 :: 1:01 pm


There is no reason after so many years that there would be limit.

I quickly hit the limit after only 20 conditionals.  This is very, very poor programming on the part of Microsoft (again).

Reply

gravatar

From Jorunn Wolstad on November 08, 2019 :: 4:51 am


Is it possible to colour mark e-mails, one by one, without making a rule?

Reply

gravatar

From Jennifer Nickerson on November 08, 2019 :: 10:24 am


It doesn’t help me to color code emails by who has sent them. I want to be able to color code my folders where I save emails. For instance, my co-worker may send me a grant related email, or an HR related email, or a seminar related email. I would find it much faster and easier to drag an email I want to save, to the red folders and find the grant folder I need to save it in, and another email from the same sender, regarding HR issues to the group of green folders and find the proper folder. All my folders are blue, alphabetical with sub folders and sub sub folders. It is a long complicated but intricately important list and slows me way down finding the initial area where I need to drag the email because ....well it just does. Sooooo, I wish I could color code my folders, not my emails and not by sender but by main subject of the folders I am saving the emails in.

Reply

gravatar

From Steve Brueckman on March 28, 2020 :: 6:18 pm


I had been searching for this information for the past 30-60 mins.

Reply

gravatar

From Victor Arias on June 05, 2020 :: 2:47 pm


Good morning.

I just happen to read your process for enhancing Outlook 365 special emails.

Is there a way to only change the color code and font to bold only to the folder title?, since the regular emails to be sent to all my contacts business and friends just need to be untouched, and always with the standard font size and Black color

If you can help me doing this will be great.

[personal information removed]

Reply

gravatar

From Leslie Lewis on August 05, 2020 :: 8:26 pm


I went through all of the steps to color code incoming emails, but it’s not working.  I must be missing something.  Ideas please? 

Thanks!

Reply

Read More Comments: 1 2

Home | About | Meet the Team | Contact Us
Media Kit | Newsletter Sponsorships | Licensing & Permissions
Accessibility Statement
Terms of Use | Privacy & Cookie Policy

Techlicious participates in affiliate programs, including the Amazon Services LLC Associates Program, which provide a small commission from some, but not all, of the "click-thru to buy" links contained in our articles. These click-thru links are determined after the article has been written, based on price and product availability — the commissions do not impact our choice of recommended product, nor the price you pay. When you use these links, you help support our ongoing editorial mission to provide you with the best product recommendations.

© Techlicious LLC.